
Crusty, sweet, chewy bread. Who doesn’t like ciabatta lightly grilled and spread with tapenade, or French toast made with challah, sautéed in butter, dusted with sugar, and covered in pure maple syrup?
While it’s been a staple of human consumption for thousands of years, most modern recipes for bread call for flour, water, salt and “active dry yeast.” This type of yeast is made of single-celled living organisms named saccharomyces cerivisiae. Like humans, yeast cells consume oxygen and exhale carbon dioxide. When mixed with gluten, a type of protein found in wheat, rye and barley, fermentation begins and the cells expel carbon dioxide, creating bubbles which make the dough rise and give it texture. Without it, you typically end up with unleavened bread, aptly called ‘flatbread’.
Active dry yeast has only been around since WWII, thanks to the Fleischmann Company which dried, granulated and vacuum-sealed the substance, bestowing on it a one to two-year life expectancy. Previously, bakers used fresh yeast which had a very short shelf life. The granules are dormant, like those sea monkeys you ordered from the backs of comic books when you were a kid. Moisture, food, and warmth activate the yeast cells and presto, you are ready to lighten your loaf.
Active dry yeast was a boon as much for reliability as for convenience, but at a price. Bread made with it just isn’t as good as it can be. So if packaged yeast compromises quality, how do you make great bread?
You make great bread without yeast.
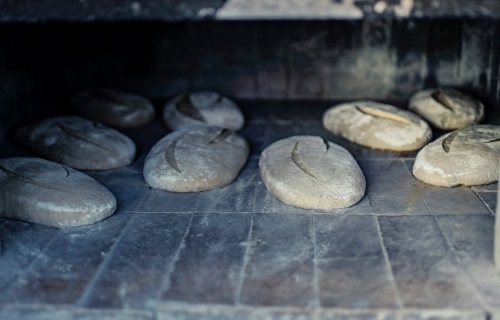
That’s exactly what the baking team at Balthazar Bakery, a wholesale outlet in Englewood, NJ does. They supply bread to the deliciously hip and fun Balthazar Restaurant in New York City, and have their own line of breads and viennoiserie, pastries made with leavened dough like croissants and brioche. The Bakery’s ovens are overseen by bakers Paula Oland and B Young, and connoisseurs regard their bread as simply the best.
“There’s yeast everywhere,” says Oland. “It’s wild yeast. It’s present in flour, in the air, on your skin. For bread, you create an environment where it will thrive. You create a ‘starter.’ Commercial yeast is incredibly potent and reactions happen very quickly. With wild yeast the reactions unfold more slowly over time. The bread is so much better because it slowly ferments. And that slow fermentation develops complex flavors and a variety of textures. It’s an older form of baking. It’s actually the original form of baking.”
The wild yeast and bacteria occurring naturally in the flour and air is all that you need. A ‘starter’ is a living culture that needs food, water, oxygen and constant temperature to ferment and multiply, a process which can take anywhere from a few days to a few weeks. Paula and B’s sourdough starter is simply flour, water and salt.
You feed the starter with water and flour daily at regularly scheduled intervals. Small bubbles and a mild yeast smell after about three to seven days are its way of thanking you for your care. If after a few days there’s nothing there, well, you’ve killed it. Wash out the bowl and try again. A portion of it is used for baking and the rest is reserved and fed to keep it going. Starters can last for years.
B explains, “It’s just flour, water and salt. What makes it is the nuance of time and temperature. The starter has life cycles and we make interventions at certain points to feed, stir, etc. It’s so simple, but the simpler something is, the more important the steps are.”
This is how breads were made historically, but there’s a good reason that people today use packaged yeast. Using a natural starter can be challenging. The process is labor-intensive and ultra temperature-sensitive.
“If there’s too much acidity the bread breaks down and becomes dense and gummy. You’ve got to pay attention to the miniscule changes,” says Paula.
Even the raw ingredients have to be at the right temperature. For B and Paula, steamy summer days mean the flour in their silo gets too hot and has to be cooled because too much heat kills the yeast. Extreme cold has the same effect. Your starter could be fine one day and dead a few days later.
“Good bread,” says Paula, “is the result of time and attention. A long fermentation allows for a wide spectrum of flavor. The flavors and textures just can’t be achieved with packaged yeast. And you need a good oven, one with consistent temperatures. That will give you a tasty, well-roasted crust.”
Balthazar bakes dozens of types of hearth breads, rustic, hearty and elegant from their signature Pain de Siegle, Pain au Levain, and sculpted dinner rolls. Its breads are beautiful and they taste better than they look. Bread-making here is an art form.
Here are some of my favorite canning recipes. I guess they are my favorites because I grow many of these items myself in my garden and orchard. You can also find literally hundreds of canning recipes, and more information on canning techniques in The Lost Ways
And that’s not because the bakers are straining to be rarefied. B and Paula are aware of tradition and appreciate what’s come before simply because that’s how you make the best bread. Their baking is as much about the absence of pretension as it is the presence of flavor and texture. But it’s still somewhat of a surprise to hear that the bakery isn’t even organic.
“We’ve worked with some organic rye, organic whole wheat, some white, even some heirloom flours. It’s not that they’re not good, they’re too expensive,” says Paula. “We work with a mill that has the expertise and resources to provide the blends we need. You need that consistency on a wholesale level.”
The same goes for butter. “We use a regular butter with cultured cream and low moisture that is perfect for us. The organic label is not a guarantee of quality…What’s important is knowing your supplier, knowing the farmers. Clean and local food is more important to us than being certified organic. We know where our ingredients come from, says Paula.”
So, is it worth it to buy bread at your local bakery rather than at the grocery store? Only you can decide, but as B points out “bakery bread is only a little more expensive than store-bought. It’s not like wine where an elite wine is 1000% percent more expensive than the cheapest table wine. The margin on bread is narrow.”
And from the looks of their thriving business, customers seem to agree.
BREAD
Ingredients:
4 cups flour
3 teaspoons dry yeast
1 3⁄4 cups lukewarm water
3 tablespoons honey or 3 tablespoons sugar
3⁄4 teaspoon salt
1⁄3 cup vegetable oil
Directions
Dissolve yeast in water, add honey and let stand until it bubbles, approx 5 to 10 minutes.
Add salt and oil to yeast mixture, then add flour a little at time until you have a stiff dough.
Turn dough out on a floured surface and mold into a ball shape. Place in pan and cover; let rise for about an hour.
Punch down the ball of dough and mold it into a loaf shape to fit you bread pan. Cover with a towel and let raise again until it doubled in size.
Bake in a preheated oven at 350°F for about 45 minutes. Bread is done when it is golden brown and sounds hollow when thumped.
Recipe: Salt Rising Bread With No Yeast
There are a half-dozen or so recipes for the pioneer bread on the Internet. This one is featured on Susan Brown’s website and comes from Pearl Haines, a Pennsylvania woman who started making the bread when she was about five years old and baked it for nearly 90 years. (Haines passed away this year.) Her starter, or “raisin,” as she called it, uses fewer ingredients than most recipes and has no sugar or salt.
Ingredients:
3 teaspoons cornmeal
1 teaspoon flour
1/8 teaspoon baking soda
1/2 cup scalded milk
Preparation:
Pour milk onto dry ingredients in an ungreased quart glass jar or metal, glass, or pottery bowl that holds about four cups. Stir. Cover with saran wrap — and punch a hole in the wrap to keep it from sinking.
Keep starter warm, at 105-115 Fahrenheit, overnight until foamy. Three suggestions: 1) Wrap the bowl in a heating pad at the lowest setting, then wrap a towel around it. 2) Set the bowl in an electric skillet with about half an inch of water, set at the lowest temperature. 3) Put it in an oven if there’s a light bulb inside that’s about 60 watts and you can keep the bulb turned on, or if the oven has a “proof” setting.
Brown suggests having a thermometer on hand to check the starter’s temperature several times during the rise.
After “raisin” has foamed and has a “cheesy” smell, put it in a medium-size bowl. Add 2 cups of warm water, then enough flour (about 1 ½ cups) to make a thin pancake-like batter. Stir and let rise again until foamy. This usually takes about 1 1/2 to 2 hours. Monitor the temperature during this stage as well.
Next, for each loaf you want to make, add one cup of warm water and 2 to 3 cups of flour (enough to be able to form the dough into a ball). Shape the dough into a loaf and place in a small loaf pan (about 8 1/2 inches by 4 1/2 by 2 1/2) greased with butter, Crisco, Pam or oil.
Let rise 2 to 3 hours. (If it doesn’t rise at that point, you’ll likely have to start over, Brown says.)
Bake at 350 degrees Fahrenheit for 35 to 40 minutes, or until the loaf is a light golden color and sounds hollow when tapped.
The bread has a long shelf life. “It can keep on your counter for a good week to ten days without going bad,” says Brown, “and if you put it in your refrigerator it’ll keep for another couple of weeks.”

HOMEMADE FRENCH BREAD RECIPE
Ingredients:
- 1 1/4 cup warm water (80-90 degrees)
- 2 teaspoons sucanat (regular sugar will work too)
- 1 teaspoon sea salt
- 3 to 3 1/2 cups flour *see note below
- 1 1/2 teaspoons active dry yeast
Instructions:
Place the yeast and sucanat in a large bowl and stir in the warm water until everything is dissolved. Add in the salt, then stir in as much flour as you can. You might not need the full amount, or you may need more– it just depends. You are looking to create a soft, pliable dough that isn’t too sticky.
Knead on a lightly floured surface for 6-8 minutes, or until the dough is smooth and elastic.
Place the dough back in the bowl and cover with a kitchen towel. Allow it to rise for about an hour, or until doubled in size.
Plop the risen dough back out on your counter top and divide in half. Roll each half into a rectangular shape (it does NOT need to be perfect. Look to make the shape about 10″ by 8″. However– I will repeat– it does NOT need to be perfect.)
Roll up the rectangle starting with a long side. Pinch the ends of the loaf to seal and shape in a “log.” If your seam doesn’t want to stick down, you might need to dip your finger in a bit of water and moisten the dough to encourage it to adhere. Otherwise, it’ll try to unroll during the baking process.
Grease a pizza stone or stoneware baking sheet and place the loaves on it to rise for another 30 minutes.
Meanwhile, preheat the oven to 375 degrees, and prepare an egg wash by beating one egg with one tablespoon of water. (The egg wash is optional– however– it gives the loaves a lovely, shiny brown finish)
Right before you pop the loaves into the oven, brush the tops with the egg wash and make 4 diagonal slashes across the top using a sharp, serrated knife.
Bake for 20-25 minutes, or until golden brown. Allow to cool on wire racks before serving.
Serve warm, with lots of butter.
Today is your chance to be part of saving our ancestors’ lost ways. I wanted to make this information available to every family out there without having to spend years of their lives or thousands of dollars.
So I came up with this great idea to edit all my manuscripts and to turn all this lost knowledge into one of the greatest books of this century:
The Lost Ways
Saving Our Forefathers’ Skills
Bread in a Bag Recipe
- 3 C all purpose flour divided
- 3 Tbsp white sugar
- 1 .25 package rapid rise yeast (2 1/4 tsp)
- 1 C warm water
- 3 Tbsp olive oil or vegetable oil
- 1 1/2 tsp salt
-
In a resealable plastic bag place 1 C flour, sugar and yeast and add in warm water.
-
Squeeze air out of the bag and seal.
-
Squish with your hands until well mixed together.
-
Let it rest for 10 minutes at room temperature. Bubbles will form.
-
Open bag and put in 1 C of flour, oil and salt.
-
Seal bag again and squish until well blended.
-
Add last cup of flour and continue mixing in the same manner until well blended.
-
Remove dough from bag and put onto a lightly floured surface.
-
Knead for 5-10 minutes or until smooth.
-
Divide dough in half and place each half into a greasedmini loaf pan. Or make one large loaf
-
Cover with a towel and allow to rise for about 30 minutes.
-
Bake in a 375 degree oven for 25-30 minutes or until bread is golden brown.

NORDIC STONE AGE BREAD (FULL OF NUTS, GRAINS AND SEEDS)
Ingredients
Provides 1 loaf of 2.2 lbs, 20 slices of 1.8 oz. (Provides 1 loaf of 1 kg, 20 slices of 50 grams.)
dry ingredients
- 3.5 oz (100 g) pumpkin seeds
- 3.5 oz (100 g) sunflower seeds
- 3.5 oz (100 g) almonds
- 3.5 oz (100 g) walnuts
- 3.5 oz (100 g) linseed
- 3.5 oz (100 g) sesame seeds
- 3.5 oz (100 g) poppy seeds (optional)
- 3.5 oz (100 g) water (optional)
- 2 tsp salt
wet ingredients
- 5 eggs
- 0.4 cup (1 dl) oil
Directions
Mix all the ingredients together, put the mass into a bread form. Lubricate if it is not “anti-stick”
1 quart (1 liter) bread form – bake for 1 hour at 320°F (160°C).
2 quarts (2 litres) bread form – bake for 1 hour at 320°F (160°C).
Here are some of my favorite canning recipes. I guess they are my favorites because I grow many of these items myself in my garden and orchard. You can also find literally hundreds of canning recipes, and more information on canning techniques in The Lost Ways
Notes
You will need approx. 1-2 eggs per 100 grams of nuts / grains / seeds, so it’s easy to add extra nuts if you would like a larger bread. If you add 100 g of nuts extra then add one more egg. If you then add an additional 100 grams more of nuts/seeds, then add 2 eggs as well. Contract.
If you do put in some extra nuts, be sure to add extra salt and oil too:
- 0.4 cup (1 dl) oil per 21 oz – 25 oz (600-700 g) extra nuts
- 1 teaspoon salt per 10 0z – 12 oz (300-350 g) extra nuts.
It is not very important as to what kind of nuts you use. If you are allergic or only have some nuts available, then just take 100 g extra of one of the kind you do have or can tolerate.
The only thing that is bothersome in this recipe, is to buy all the right so that you have them in the pantry at the same time. Well that and then to mix them. So I usually mix the dry ingredients for 4 loaves in freezer bags, that I can keep until I need to bake them.
The bread lasts for 3-4 days in a drawer. A lot longer in the fridge.
You can use pine nuts instead of poppy seeds. Feel free to try that if you win the lottery:-s
The bread tend to be a bit on the dry side, so I often put in the optional water.
Mini nut bars
When you have to travel, or you need something for the lunchbox, it is also a good bread to bake in small cake molds / muffin tins. As a nutty “mini bread”. They should bake about 25 minutes.
Zucchini for a moister bread
- 1 grated zucchini (about 9 oz (250 g)) – you can also use carrot
- 1 egg extra
You can get a softer and more moist bread by grating a squash and put that in the dough. It goes moldy somewhat faster at room temperature, so it must be stored in the refrigerator.
Books can be your best pre-collapse investment.
Carnivore’s Bible (is a wellknown meat processor providing custom meat processing services locally andacross the state of Montana and more. Whether your needs are for domestic meator wild game meat processing)
The Lost Book of Remedies PDF ( contains a series of medicinal andherbal recipes to make home made remedies from medicinal plants and herbs.Chromic diseases and maladies can be overcome by taking the remediesoutlined in this book. The writer claims that his grandfather was taughtherbalism and healing whilst in active service during world war twoand that he has treated many soldiers with his home made cures. )
Easy Cellar(Info about building and managing your root cellar, plus printable plans. The book on building and using root cellars – The Complete Root Cellar Book.)
The Lost Ways (Learn the long forgotten secrets that helped our forefathers survive famines,wars,economic crisis and anything else life threw at them)
LOST WAYS 2 ( Wordof the day: Prepare! And do it the old fashion way, like our fore-fathers did it and succeed longbefore us,because what lies ahead of us will require all the help we can get. Watch this video and learn the 3 skills that ensured our ancestors survival in hard times offamine and war.)