

How To Build A DIY Portable Solar Power Generator (For Under $200)
Have you ever gone on a camping trip with non preppers?
This project was born from a camping with my better half and a group of friends. These friends are not of our prepper mindset and as such had no way to recharge their phones, batteries or run any kind of device that required power.
(Personally, I welcome the screen-free days.)
We were camping for 5 days so it wasn’t long before they started to come to me to use my inverter. I normally have a small 150w stashed in the trunk for emergencies, or times like these.
On the last day of camping, we got into a discussion on the number of batteries we had all gone through over the 5 days and how much it had cost us…needless to say I wasn’t happy at the final figure and decided that for the next trip, I would have something that would save us all money and would preferably be free.
The idea for a portable solar generator was born!
This was my first foray into solar power, and I wanted to share this with you to show how easy it can be done, and why you shouldn’t be afraid to get your hands dirty with solar power.

My Requirements
First up I made a list of my requirements;
- Has to be portable – large deep cycle batteries were out unless I wanted to drag a trolly with me and that would pose a problem fitting it into the car.
- Has to power anything that requires a USB and/or DC connection – I didn’t need to power any A/C appliances such as a refrigerator or a television.
- Should look inconspicuous and not out of place in a home, car or tent – this project was also for post SHTF moments and I wanted to have it to hand without guests asking questions.
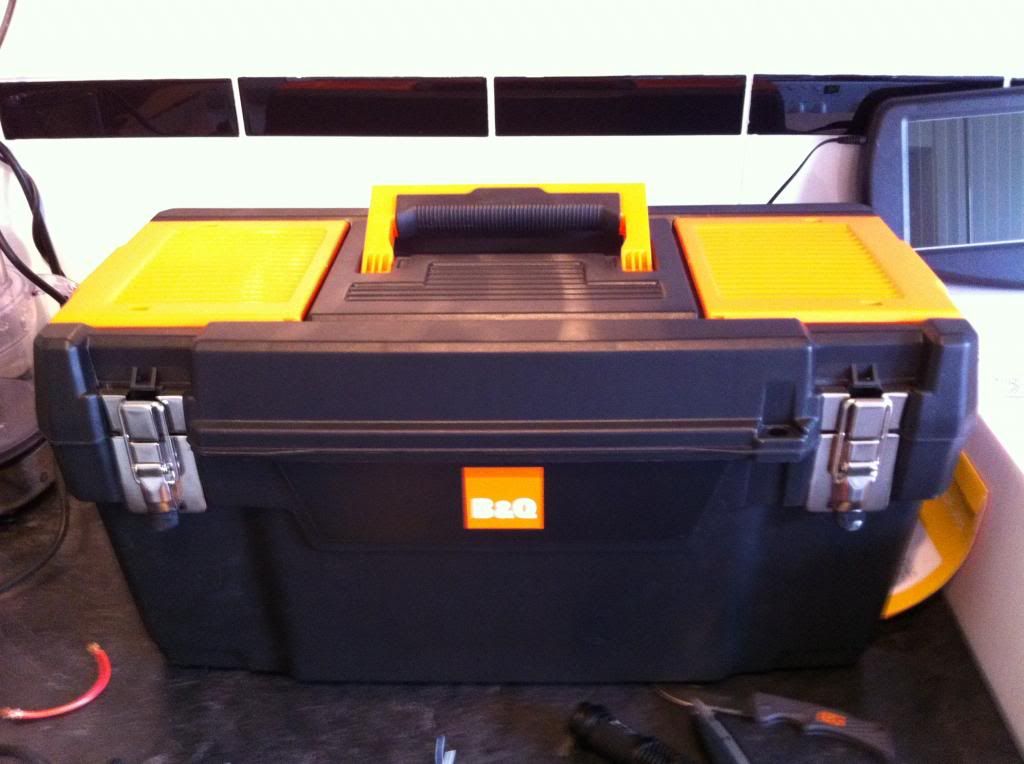
Here is what I came up with – the finished product.

What follows is a list of materials and tools used to construct. (note – all of the products were purchased via Ebay UK, the same or similar can be had from Ebay.com)
Materials List
- 4x Power Sonic 12v 7ah Deep Cycle Batteries
- 36x A Grade Solar Cells (inc Flux Pen, Tabbing Wire & Bus Wire)
- 20″ Tool Box
- Hella Socket & Plug
- 12v DC Socket
- 12 AWG Wire Black (2m)
- 12 AWG Wire Red (2m)
- Inline Fuse Holder
- 10amp PWM Charge Controller
- Digital Watt Meter (Battery Power Analyser)
- 100x Male & Female Spade Connectors
- 4m 5mm Wide Bus Wire
- 8m Tabbing Wire
- 2x Blue LED Rocker Switch
- 2x Red Rocker Switch
- Chocolate Block Connector
- 2.4w 12v Trickle Charger
Tools Required
- Digital Multimeter
- 80w Soldering Iron
The total cost for the project so far is around $200, including the 30 watt solar panel I am in the process of making. You can save money buying from the online auction sites.
The Build
Here we have all of the major elements that will be going into or onto the tool box.

Next a shot of 1 of the 4 batteries I used, these are 12v 7ah batteries, normally used to power electric bikes, scooters and toy cars.

One for scale!

You can see the terminals used on the top which make connecting wires very easy with female spade connectors

Here is a close up of the digital battery power meter I picked up for around $25 on Ebay

It didn’t come with any connectors so I had to add spade connectors and heat shrink to make it look nice!


Here is the second charge controller I bought as the first didn’t work 

Charge Controller – Controls the power to and from the batteries and solar panel
Next up we have the Hella socket and plug

The 2v DC sockets and switches installed in the lid (which has the orange cover) My Dremel tool made this so easy!

My master power switch and power analyzer under the lid on the opposite side to the 12v DC plugs

Here’s how it looked underneath

Then I wired the 4 batteries in parallel (which keeps the voltage the same at 12v but multiply the amp hours (ah). 4x 7ah gives me 28ah…simples!

I also added a 12v inline fuse which you can see in the image above, this is between the battery bank and the master power switch.
Here is a close up of the Hella socket installed


And one of the 2x 12v DC sockets along with blue LED switches to show me they are on and working!

Here is my second charge controller (working this time)

The Power Analyser installed next to the master switch…we have power!

Checking the power output

Here is the trickle charger and it plugged in (only a 2.4w panel)

Here is where the solar panel connects using the Hella Socket.

And the battery power analyzer telling me we’re good to go

The finished products….looking very unobtrusive….OPSEC!
The next stage will be to complete my solar panel which I have already started working on tabbing the cells together etc. I will share that with you all once completed.
Hope you enjoyed reading about my project as much as I have enjoyed building it.
If you’re thinking about making your own I would encourage you to do so, you will learn a lot and if you have any question please ask in the comments below.
Are you worried about your future? Are you worried by the many disasters that you face in your everyday life? Worry no more. The Lost Ways comes in to solve your woes. This program was created by Davis Claude and its major role is to prepare and teach you how to handle worst-case scenarios using the least independence. This program will therefore motivate you to protect your family and friends during the worst period without the help of the modern technology.
Remember, calamities are everywhere: at work, home, school and many other places. These calamities cause tension and leads to a decrease in productivity. This may finally lead to a reduction in life. Fortunately, the lost ways review will provide solutions to these situations. It will give you the tips for preparing yourself when nothing seems to go as expected.
Generally, most people are optimistic. This makes them unprepared for failure. However, the best thing is to prepare for worst times. It is important to tell your kids about earthquakes, fire outbreaks, extreme weather conditions and other calamities. Tell them how to deal with these calamities in case they occur.
Other useful resources:
The Lost Ways (Learn the long forgotten secrets that helped our forefathers survive famines,wars,economic crisis and anything else life threw at them)
Survival MD (Best Post Collapse First Aid Survival Guide Ever)
Backyard Innovator (A Self Sustaining Source Of Fresh Meat,Vegetables And Clean Drinking Water)
Blackout USA (EMP survival and preparedness)
Conquering the coming collapse (Financial advice and preparedness )
Liberty Generator (Build and make your own energy source)
Backyard Liberty (Easy and cheap DIY Aquaponic system to grow your organic and living food bank)
Bullet Proof Home (A Prepper’s Guide in Safeguarding a Home )
Family Self Defense (Best Self Defense Strategies For You And Your Family)
Survive Any Crisis (Best Items To Hoard For A Long Term Crisis)
Survive The End Days (Biggest Cover Up Of Our President)
Drought USA (Discover The Amazing Device That Turns Air Into Water)
SOURCE : prepperzine.com
‘Mountain Man’ John
‘Mountain Man’ John is a Survival and Preparedness enthusiast who loves everything outdoors. He has a passion for learning anything and everything to help sustain his and his families way of life post SHTF. He frequently shares his knowledge on a variety of topics from his hands on DIY projects, learning new skills such as hunting and trapping along with reviews on his Survival related purchases – Prepping has been in his family for generations, it’s in his blood. You can follow John by subscribing to his newsletter on the PrepperZine.com homepage, or by following him on Facebook.
This is a power storage unit. It does not ‘generate’ any power…unfortunately!
Connected to a 100 to 400 watt solar panel (power generator) it could be very useful.
Vagn – not sure I understand your objection. With the solar panel shown (albeit a small one) this unit does generate (and store) DC.
Schematic or wiring diagram?
Yes, a wiring diagram would be very helpful.
I like the choice of that tool box. As they say, it is unobtrusive and should be quite robust.
Porque el regulador de 10a ? no alcanza el de 5a? Saludos.
You showed but didn’t list or include the two cooling fans. Was there a plan, or found it not necessary (or no more room)?
And as soon as they a freed up, they immediately start flowing through
the wires to power your electrical loads.
What is the weight of the unit?
can it be upgraded to handle the requirements of a motorhome e.g. A/C , fridge, induction cooker?
Here are the numbers from our test:
BMK Reading: 200 amp hours in 11 hours
Kill-A-Watt Reading: 1.530 kwh in 11 hours
If you do the math of converting kilowatts into 12v amp hours you’ll see our fridge only used about 130 amp hours of battery. My answer to this discrepancy: Power is always lost when using an inverter and there are parasitic draws from our battery we cannot control (such as vent fans, LED lights, radio, etc).
I did run a separate test while plugged into shore power with the A/C set to 74° and the fridge pulled 2.392 kwh in 24 hours (1.097 kwh in 11 hours). This tells me when temperatures are a little cooler the fridge doesn’t have to work quite as hard.
I personally think the conditions were perfect for our off the grid RV Fridge Test as it wasn’t too hot and we were in shade (or it was night) for half of the testing hours. The temperature was a mild 80 degrees and there was a slight breeze to keep the air moving inside the motorhome.
It’s also good to note we spent the entire day outside of the RV as we wanted to test only the refrigerator power usage. Our TVs were still plugged in but they were off and the only other thing using electricity was the overhead LED lights for the few minutes while filming inside the coach. We did open the fridge a few times to get stuff for lunch and the occasional beverage, but that’s “real-life use”.