
 One of those lovely old-fashioned skills every respectable pioneer woman ought to know is how to render animal fat. Lard from pigs or tallow from cattle was a prized possession for those who lived off of the land. It is the cooking fat of choice for many reasons and can also be used for lighting and To Make Traditional Soap
What Is Lard and How Do I Use It?
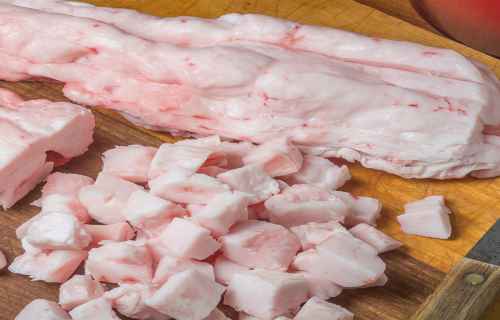
Lard can come from any part of the pig, but “Meat4 All” finalist of meat-centric points out, “If you were trying to render some lard out of a pork loin, you would not get a lot.” Look to the fattiest parts of the hog itself: “You’ll be better off trying to render fat from the belly, which is where we get ours from.” Same goes for fatty bacon, pork shoulders, and pork butts.
Store-bought lard from the grocery store can’t compete with high-quality lard from a butcher, which is in turn not quite as good as the stuff you’ll make at home. It’s very easy to make; the bacon that’s been sizzling away has left lard in the bottom of the pan. If you’ve been slow-cooking a pork shoulder for a while, the fat that has rendered in the bottom of the pan is lard. One tip: Meat4 All suggests you pour that fat through a very fine strainer to remove any burned, black flecks. “Those burned bits can turn your lard.” Store it tightly sealed in the fridge or freezer, and it can keep for months.
When you are canning meat products remember these things.
How do I use it?
First, don’t fill up your deep fryer. Toups cautions, “Lard has a low smoke point.” It’s a higher smoke point than olive oil or butter, but lower than veggie or safflower oil. But it can handle a 400 degree oven, and you can toss it in a sauté pan instead of butter to fry eggs or sauté veggies. Use it to baste chickens at the end of cooking to get a crackly skin. Anticipate a meaty, smoky flavor profile—it’s pig fat, after all—which is why makes his cornbread with half lard, half butter.
When you cook with lard, you get the bonus of adding extra vitamin D to your diet, something no other cooking oil (except butter) can boast. “You basically have a vitamin D supplement built into your fat,” says Lily Nichols, RDN, CDE, CLT. A tablespoon of lard from a pasture-raised pig has about 1,000 IU of vitamin D, according to Nichols. By comparison, 1 tablespoon of butter has 9 IU of vitamin D, while the same amount of olive oil has none. In fact, lard is one of the highest dietary sources of vitamin D—a nutrient in which about 42% of U.S. adults are deficient.
Because lard contains more saturated fat than veggie oils, it doesn’t go rancid as quickly and has a higher smoke point, making it better for frying and high-heat cooking. “The chemical makeup of saturated fats is very stable,” Nichols says. “Unsaturated fats like those found in vegetable oils, on the other hand, tend to go bad and change structure the longer they cook.” This means oils like canola, corn, or olive cooked at a high heat or used repeatedly (like in restaurant fry cookers) can start to break down and release free radicals, which then lead to inflammation.
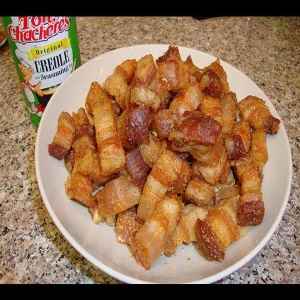
PORK CRACKLINGS
These delicious pork rinds are incredibly easy to make—and delicious, too! You can buy pork skin in butcher shops.
Ingredients
- 1 pound pork skin, cut into 1-inch pieces
- 2 heaping tablespoons kosher salt
- 2 heaping tablespoons granulated sugar
- 3 cups vegetable oil
Method
Toss the pork skin pieces with the salt and sugar, coa ting them evenly. Transfer to the refrigerator and chill for 12 hours.
Remove the pork skin pieces from the refrigerator and dry them on paper towels. Put the oil in a large pot with high sides and heat until it reaches 350ºF. Working in batches, add the pork skin pieces and fry until crispy, about 7 minutes. (Make sure that the temperature of the oil returns to 350ºF before frying a new batch.) Remove with a slotted spoon and transfer to a paper towel–lined plate to drain. Season with salt and pepper before serving.
If that’s not enough to convince you, lard also just makes things taste better—there’s a reason your grandma used it in everything from pies to scrambled eggs. “Lard is the fat that has the largest crystals, so it’s going to make things like tamales and pastries the fluffiest and flakiest” . “There’s no comparison in cooking beans with lard and cooking them with oil.” You can use it for just about everything – frying or roasting vegetables, frying meat, cooking eggs, as the shortening in biscuits or pastries, spread on toast with a sprinkling of salt, as a substitute for butter in your cookies or cake… the possibilities are endless… and so are the ways in which you can use “fat bag” in a sentence.
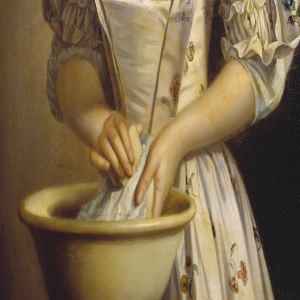
How To Make Traditional Soap
There was a reason why pioneer women had such soft skin. Their weapons against wrinkles and dry, cracked skin were protection from the sun and hot-process lye soap. Even before the first recorded history, lye soap was being made and used.
Fall in pioneer America was followed shortly by lye soap making. The annual rite carried on well into the 20th century. The soap recipe was simple. Mix lye with melted fat over a low fire and slowly cook the combination until the water evaporated. What remained was lye soap. The process hasn’t changed much—anyone with a big pot or a slow cooker can make their own.
“Fat from the freshly killed hogs was rendered down for cooking, storing food and other family uses. It was too valuable to be turned into soap. Lye soap was made from the old fat that was left in the crocks at the end of the year.”
Before homes had refrigerators, cooked chickens, pork or other meats were packed in big crockery pots and covered with lard. The fat formed a protective barrier that kept the meat from ruining. This fat was later used for soap making.
Long ago, women didn’t use different kinds of soap for hygiene, laundry, baby care, dishes, or house cleaning. Everything was done with one type of soap, which was made from three main ingredients: tallow, lye, and water.
Basic Lard Soap Recipe
A brilliant white soap with large creamy bubbles. It will have a slight fatty smell, so you might want to add essential oils.
Ingredients:
2 oz (57g) Lye Crystals
5 oz (142g) ice cold distilled water
16 oz (454g) Lard
Optional essential oils
Tallow Soap Recipe
This soap is made from Tallow (dripping), it makes a hard soap and is quick to reach the ‘trace stage’.
Ingredients:
2 oz (57g) Lye Crystals
5 oz (142g) ice cold distilled water
16 oz (454g) Tallow
Optional essential oils
Vegetarian Soap
This is a softer lye soap and will take longer to reach the ‘trace stage’ (around 30 minutes).
Ingredients:
2 oz (57g) Lye Crystals
5 oz (142g) ice cold distilled water
16 oz (454g) Shortening
Optional essential oils
After about 20 minutes, the water was gently bubbling and the lard had turned to a clear puddle floating on the water. You measured out 8 ounces of lye and added it to cool water in a plastic pitcher. (Lye reacts with metals like aluminum. Stick with plastic, glass or stainless steel.)
“Never pour sodium hydroxide (lye) on hot fat,” . “It can explode. Instead, thoroughly (and slowly) dissolve the lye in water (into plastic that will stand boiling water—most Tupperware-type products will) before adding it to the hot mixture, and let the lye and water cool to around 100 degrees.”
She added the lye and water to the fat and water in the kettle, and the process of evaporation began. You can used a small wooden paddle to stir the mixture in the kettle to prevent separation.
“After a few minutes of stirring, the lye, water and fat turns into a brownish, soupy mix,” . “This is called saponification. It is a chemical reaction that occurs when oil or fat is mixed with a strong alkali. Once this happens, the lye is no longer dangerous. [Editor’s note: In very old soap—as in, years old—lye in soap can precipitate and form new little nodules of lye. It’s still good hand soap, or laundry soap if you shave it, but you wouldn’t want to use it on your face!) After the evaporation is complete, the end result is soap, and glycerin is a by-product. Commercial soap makers separate the glycerin and sell it separately. We leave it in our soap because it has additional skin benefits.”
The Super Soap
“Lye soap helps take the itch and redness out of poison ivy, and jewelweed poultices were an herbal remedy to keep down the blistering and swelling,” . “Combining the two makes a soap that is excellent to remove the ivy oil from skin and keep the rash from spreading. But it does more. For many people, it makes the itch go away after a few days, instead of the usual two weeks or more. Just dampen the soap and rub it on the itchy places.”
“One of the advantages of making hot-process soaps is the variety of things that can be added to make the soaps provide more benefits,”. “The disadvantage is that they don’t hold colors or scents very well.”
Final Steps
After four hours of cooking, the batch of soap looked like thick split-pea soup and was almost ready to go into a mold.
“When the soap sheets off the paddle, instead of just dripping, it’s ready,” Linda said. “Once it’s cooled it will take two or three weeks to completely harden. The mold I use already has dividers so that each bar will be the same size. Most people use a rectangular cake pan or a wooden box lined with freezer paper and cut the soap with a knife.”
Using a giant ladle and a pitcher, you quickly poured the cooling soap into the mold. The excess soap was ladled into other containers, to be cut into bars by hand after it fully hardened.
“The soap needs to be covered so it can cool slowly,” . “This aids in the hardening process.”“It never ceases to amaze me,” , “that it is possible to take something as nasty as fat and as caustic as lye and end up with them making a nice mild soap.”
Lamps Burned Lard
The great objection to the employment ot the above-named lamps is the difficulty that is experienced in lighting the wick from the cooling of the lard, and consequently hardening around the wick. To remedy this incen-venience, an improvement has been invented by Isaac H. Bartholomew, of Northford, Ct., who has taken measures to secure a patent.-The inventor uses an additional oil lamp, and a copper or other metallic tube, which is suspended over this last-named lamp, and furnished with reflectors, by which the lard round the wick of the other lamp is melted and also the lard in the body of the lamp. Both apparatus being only used until the purpose is effected, when the oil lamp is extinguished and the heat conductor removed.
Whale oil and other burning fluids were used for light at the beginning of the 19th century, long before electricity was available. But around 1835, a different lamp fuel gained popularity–lard.
Burning fluids were dangerous because they were explosive if handled carelessly. Lard was almost solid, and therefore safe. It could be made at home on the farm and could be stored. But the thick lard had to be encouraged to flow up the wick to the flame. Many special, patented lard-oil lamps were invented in the 1840s to 1860s. Most lard-oil burners were made to bring heat to the fuel. The wick holders were often wide and flat. Some of the lamps used a plunger to force the lard into the wick.
Lighting changed in the 1860s, when kerosene became the fuel of choice for lamps used in cities and towns.
A grand encyclopedia of country Meat4All , weather wisdom, country remedies and herbal cures, cleaning solutions, pest purges, firewood essentials, adobe making and bricklaying, leather working, plant dyes, farm foods, natural teas and tonics, granola, bread making, beer brewing and winemaking, jams and jellies, canning and preserving, sausage making and meat smoking, drying foods, down-home toys, papermaking, candle crafting, homemade soaps and shampoos, butter and cheese making, fishing and hunting secrets, and much more. Meat4 All : Traditional Skills for Simple Living
Books can be your best pre-collapse investment.
The Lost Ways (Learn the long forgotten secrets that helped our forefathers survive famines,wars,economic crisis and anything else life threw at them)
Survival MD (Best Post Collapse First Aid Survival Guide Ever)
Conquering the coming collapse (Financial advice and preparedness )
Liberty Generator (Build and make your own energy source)
Backyard Liberty (Easy and cheap DIY Aquaponic system to grow your organic and living food bank)
Bullet Proof Home (A Prepper’s Guide in Safeguarding a Home )
Family Self Defense (Best Self Defense Strategies For You And Your Family)
Survive Any Crisis (Best Items To Hoard For A Long Term Crisis)
Survive The End Days (Biggest Cover Up Of Our President)