
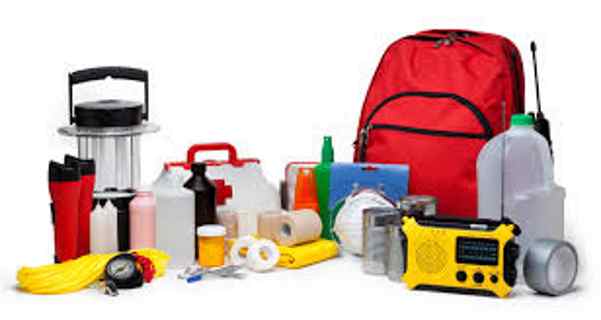
Disaster Supplies Kit
After a disaster, local officials and relief workers will be on the scene, but they cannot reach everyone immediately. You could get help in hours, or it may take days. Basic services, such as electricity, gas, water, and telephones, may be cut off, or you may have to evacuate at a moment’s notice. You probably won’t have time to shop or search for the supplies you’ll need. Your family will cope best by preparing for disaster before it strikes.
What Is a Disaster Supplies Kit?
Assembling the supplies you might need following a disaster is an important part of your Family Disaster Plan. Following a disaster, having extra supplies at home or supplies to take with you in the event of an evacuation can help your family endure evacuation or home confinement. Learn more about Disaster Supplies Kits by contacting your local emergency management agency or your local American Red Cross chapter.
Awareness Information

Involve Children in Disaster Preparedness.
Ask children to help you remember to keep your kits in working order by changing the food and water every six months and replacing batteries as necessary. Children might make calendars or posters with the appropriate dates marked on them. Ask children to think of items that they would like to include in their own Disaster Supplies Kit, such as books or games or appropriate nonperishable food items.
Prepare Your Kit
Tips for Your Disaster Supplies Kit
Keep a smaller Disaster Supplies Kit in the trunk of each car. If you become stranded or are not able to return home, having some items will help you to be more comfortable until help arrives.
Keep items in airtight plastic bags. This will help protect them from damage or spoiling.
Replace stored food and water every six months. Replacing your food and water supplies will help ensure their freshness.
Rethink your kit and family needs at least once a year. Replace batteries, update clothes, etc.
Ask your physician or pharmacist about storing prescription medications. It may be difficult to obtain prescription medications during a disaster because stores may be closed or supplies may be limited.
Use an easy-to-carry container for the supplies you would most likely need for an evacuation. Label it clearly. Possible containers include:
A large, covered trash container.
A camping backpack.
A duffel bag.
A cargo container that will fit on the roof of your vehicle.
Disaster Supplies Kit Basics
The following items might be needed at home or for an evacuation. Keeping them in an easy-to-carry backpack or duffel bag near your door would be best in case you need to evacuate quickly, such as in a tsunami, flash flood, or major chemical emergency. Store your kit in a convenient place known to all family members. Kit basics are:
A portable, battery-powered radio or television and extra batteries.
Flashlight and extra batteries.
First aid kit and first aid manual.
Supply of prescription medications.
Credit card and cash.
Personal identification.
An extra set of car keys.
Matches in a waterproof container.
Signal flare.
Map of the area and phone numbers of places you could go.
Special needs, for example, diapers or formula, prescription medicines and copies of prescriptions, hearing aid batteries, spare wheelchair battery, spare eyeglasses, or other physical needs.
If you have additional space, consider adding some of the items from your Evacuation Supplies Kit.
Evacuation Supplies Kit
Place in an easy-to-carry container the supplies you would most likely need if you were to be away from home for several days. Label the container clearly. Remember to include:
Disaster Supplies Kit basics.
Three gallons of water per person.
Three-day supply of nonperishable food.
Kitchen accessories: manual can opener; mess kits or paper cups, plates, and plastic/disposable utensils; utility knife; a can of cooking fuel if food must be cooked; household liquid bleach to treat drinking water; sugar, salt, pepper; aluminum foil; plastic resealable bags.
One complete change of clothing and footwear for each family member, sturdy shoes or workboots, raingear, hat and gloves, thermal underwear, sunglasses.
Blankets or sleeping bag for each family member.
Tools and other accessories: paper, pencil; needles and thread; pliers, shut-off wrench, shovels, and other useful tools; tape; medicine dropper; whistle; plastic sheeting; small canister, A-B-C-type fire extinguisher; emergency preparedness manual; tube tent; compass.
Sanitation and hygiene items: toilet paper, towelettes; soap, hand sanitizer, liquid detergent; feminine supplies; personal items such as shampoo, deodorant, toothpaste, toothbrushes, comb and brush, lip balm; plastic garbage bags (heavy-duty) and ties (for personal sanitation uses); medium-sized plastic bucket with tight lid; disinfectant; household chlorine bleach; small shovel for digging an expedient latrine.
Entertainment, such as games and books.
Remember to consider the needs of very young and older family members, such as infants and elderly or disabled persons.
For baby: formula, diapers, bottles, powdered milk, medications.
For adults: heart and high blood pressure medication, insulin, prescription drugs, denture needs, contact lenses and supplies, extra eyeglasses, and hearing aid batteries.
To Build a Makeshift Toilet
Line a bucket with a garbage bag and make a toilet seat out of two boards placed parallel to each other across the bucket. After each use, pour a disinfectant such as bleach (1 part liquid chlorine bleach to 10 parts water) into the garbage bag. This will help avoid infection and stop the spread of disease. Cover the bucket tightly when it is not in use.
Bury garbage and human waste to avoid the spread of disease by rats and insects. Dig a pit two to three feet deep and at least 50 feet downhill or away from any well, spring, or water supply.
Home Disaster Supplies Kit
In addition to your Disaster Supplies Kit basics and Evacuation Supplies Kit, gathering the following items will help your family endure home confinement, which often happens following disasters and may include the loss of utilities.
Wrench to turn off household gas and water. Keep it near the shut-off valves.
A week’s supply of food and water.
Additional blankets and sleeping bags.
Also, consider using a NOAA Weather Radio with the tone-alert feature in your home. NOAA Weather Radio is the best means for receiving warnings from the National Weather Service. The National Weather Service continuously broadcasts updated weather warnings and forecasts that can be received by NOAA Weather Radios sold in many stores. NOAA Weather Radio now broadcasts warning and postevent information for all types of hazards–both natural (such as earthquakes and volcanic activity) and technological (such as chemical releases or oil spills). Working with other federal agencies and the Federal Communications Commission’s new Emergency Alert System, NOAA Weather Radio is an “all hazards” radio network, making it the single source for the most comprehensive weather and emergency information available to the public. Your National Weather Service recommends purchasing a radio that has both a battery backup and a Specific Area Message Encoder (SAME) feature, which automatically alerts you when a watch or warning is issued for your county, giving you immediate information about a life-threatening situation. The average range is 40 miles, depending on topography; the National Weather Radio signal is a line-of-sight signal, which does not bore through hills or mountains.
Water
Having an ample supply of clean water is a top priority in an emergency.
Store water in plastic containers, such as soft drink plastic bottles. Seal containers tightly, label them and store in a cool, dark place. Replace water every six months. Avoid using containers that will decompose or break, such as milk cartons or glass bottles.
Keep at least a three-day supply of water, or a minimum of three gallons per person. It is strongly recommended to have more if possible. Use one-half gallon per day for drinking, and one-half gallon for cooking and sanitation. A normally active person needs to drink at least two quarts of water each day. Hot environments and intense physical activity can double that amount. Children, nursing mothers, and ill people will need more. Store your three-day supply in a handy place. You need to have water packed and ready in case there is no time to fill water bottles when disaster strikes.
Water needs to be treated only if it is of questionable purity.
Boiling is the safest method of treating water. Strain water through a clean cloth to remove bulk impurities. Bring water to a rolling boil for about one full minute, keeping in mind that some water will evaporate. Let the water cool before drinking. Boiled water will taste better if you put oxygen back into it by pouring the water back and forth between two clean containers. This will also improve the taste of stored water.
You can use household liquid bleach to kill microorganisms. Use only regular household liquid bleach that contains 5.25 percent sodium hypochlorite. Do not use scented bleaches, color-safe bleaches, or bleaches with added cleaners. Add 16 drops of bleach per gallon of water, stir, and let stand for 30 minutes. If the water does not have a slight bleach odor, repeat the dosage and let stand another 15 minutes. If it still does not smell of chlorine, discard it and find another source of water. Other chemicals, such as iodine or water treatment products sold in camping or surplus stores that do not contain 5.25 percent hypochlorite as the only active ingredient, are not recommended and should not be used.
Distillation involves boiling water and then collecting the vapor that condenses back to water. The condensed vapor will not include salt or other solid impurities. To distill, fill a pot halfway with water. Tie a cup to the handle on the pot’s lid so that the cup will hang rightside up when the lid is upside down (make sure the cup is not touching the water) and boil the water for 20 minutes. The water that drips from the lid into the cup is distilled.
Melt ice cubes or use water from undamaged hot water tanks, toilet tanks (not the bowl), and water pipes if you need additional water.
If you need to find water outside of your home, you can use rainwater; streams, rivers, and other moving bodies of water; ponds and lakes; and natural springs. If you question its purity, be sure to treat the water first. Avoid water with floating material, an odor, or a dark color. Use saltwater only if you distill it first. Do NOT drink flood water.
Food
Even though it is unlikely that an emergency would cut off your food supply for two weeks, you should consider preparing a supply that will last that long. The easiest way to develop a two-week stockpile is to increase the amount of basic foods you normally keep on your shelves. If your water supply is limited, try to avoid foods that are high in fat and protein, and don’t stock salty foods, since they will make you thirsty. Familiar foods can lift morale and give a feeling of security in time of stress. Also, canned foods won’t require cooking, water, or special preparation. Take into account your family’s unique needs and tastes. Try to include foods that they will enjoy and that are also high in calories, protein, carbohydrates, vitamins, and minerals.
Pack at least a three-day supply of nonperishable food and water, and store it in a handy place. You need to have these items packed and ready in case there is no time to gather food from the kitchen when disaster strikes.
Select foods that require no refrigeration, preparation, or cooking, and little or no water. Foods that are compact and lightweight are easy to store and carry.
If you must heat food, pack a can of cooking fuel.
Try to eat salt-free crackers, whole grain cereals, and canned food with high liquid content.
Recommended foods include:
Ready-to-eat canned meats, fruits, and vegetables.
Canned juice, milk, and soup (if powdered, store extra water).
High-energy foods, such as peanut butter, jelly, crackers, granola bars, and trail mix.
Comfort foods, such as hard candy, sweetened cereals, candy bars, and cookies.
Instant coffee, tea bags.
Foods for infants, elderly persons, or persons on special diets, if necessary.
Also consider:
Compressed food bars. They store well, are lightweight, taste good, and are nutritious.
Trail mix. Available prepackaged, or assemble your own.
Dried foods. They can be nutritious and satisfying, but contain a lot of salt, which promotes thirst.
Freeze-dried foods. They are tasty and lightweight, but will need water for reconstitution.
Instant meals. Cups of noodles or cups of soup are a good addition, although they need water for reconstitution.
Snack-sized canned goods. Good because they generally have pull-top lids or twist-open keys.
Prepackaged beverages. Those in foil packets and foil-lined boxes are suitable because they are tightly sealed and will keep for a long time.
Food options to avoid:
Commercially dehydrated foods. They can require a great deal of water for reconstitution and extra effort in preparation.
Bottled foods. They are generally too heavy and bulky, and break easily.
Meal-sized canned foods. They are usually bulky and heavy.
Whole grains, beans, pasta. Preparation could be complicated under the circumstances of a disaster.
If your electricity goes off:
First, use perishable food and foods from the refrigerator.
Then, use the foods from the freezer. To minimize the number of times you open the freezer door, post a list of freezer contents on it. In a well-filled, well-insulated freezer, foods will usually still have ice crystals in their centers (meaning foods are safe to eat) for at least three days.
Finally, begin to use nonperishable foods and staples.
Remember to store nonperishable foods for your pets.
First Aid Kit
Assemble a first aid kit for your Disaster Supplies Kit and one for each car.
The basics for your first aid kit include:
First aid manual.
Sterile adhesive bandages in assorted sizes.
Assorted sizes of safety pins.
Cleansing agent/soap.
Latex gloves (2 pairs).
Sunscreen.
2-inch sterile gauze pads (4-6).
4-inch sterile gauze pads (4-6).
Triangular bandages (3).
Nonprescription drugs.
2-inch sterile roller bandages (3 rolls).
3-inch sterile roller bandages (3 rolls).
Scissors.
Tweezers.
Needle.
Moistened towelettes.
Antiseptic.
Thermometer.
Tongue depressor blades (2).
Tube of petroleum jelly or other lubricant.
Have the following nonprescription drugs in your Disaster Supplies Kit:
Aspirin or nonaspirin pain reliever.
Antidiarrhea medication.
Antacid (for stomach upset).
Syrup of ipecac (use to induce vomiting if advised by the poison control center).
Laxative.
Activated charcoal (use if advised by the poison control center).
Vitamins.
Add any necessary prescription and nonprescription drugs.
Add special needs for infants, elderly persons, or anyone with serious allergies.
Important Documents
Keep the following original documents in a safe deposit box if possible, and copies in a waterproof, fire-resistant portable container:
Will, insurance policies, contracts, deeds, stocks and bonds.
Passports, social security cards, immunization records.
Bank account numbers.
Credit card account numbers and companies.
Inventory of valuable household goods, important telephone numbers.
Family records (birth, marriage, death certificates).
Other useful resources:
Survival MD (Best Post Collapse First Aid Survival Guide Ever)
Backyard Innovator (A Self Sustaining Source Of Fresh Meat,Vegetables And Clean Drinking Water)
Blackout USA (EMP survival and preparedness)
Conquering the coming collapse (Financial advice and preparedness )
Liberty Generator (Build and make your own energy source)
Backyard Liberty (Easy and cheap DIY Aquaponic system to grow your organic and living food bank)
Bullet Proof Home (A Prepper’s Guide in Safeguarding a Home )
Family Self Defense (Best Self Defense Strategies For You And Your Family)
Sold Out After Crisis (Best 37 Items To Hoard For A Long Term Crisis)
Survive The End Days (Biggest Cover Up Of Our President)
Drought USA(Discover The Amazing Device That Turns Air Into Water)
SOURCE : www.disastercenter.com