
 At some point in your life, you’ve probably played with dirt. It’s a practice that many people around the world and throughout history have continued long past childhood, using the abundant material to construct shelters. Earth sheltered homes, including underground homes, are becoming a viable passive design strategy.
When you build into the ground, the earth functions as a thermal mass, helping to maintain a comfortable interior temperature year-round. However, the structure itself must be carefully planned in order to carry the load of the earth, and considerations must be made outside the realm of traditional home building. For example, retaining walls must be constructed and drainage pipes installed to protect the structure from water infiltration.
Underground homes are typically made of reinforced concrete because it does not degrade and exhibits high compressive strength. Dome structures are popular because of how well they distribute the weight of earth. A layer of insulation must also be installed, as the earth alone is not enough. Finally, homes below grade must be extensively waterproofed. The most common systems include rubberized asphalt, plastic sheeting, liquid polyurethanes.
There are three main types of earth sheltered homes:
In-hill
If the topography of your site includes a steep-enough slope, it is possible excavate into this hill side and bury a portion of your home. In these types of earth sheltered homes, one wall is typically left exposed so windows can be installed and the structure can gain heat via passive solar methods.
Bermed
On flatter sites, you can pack the earth against the exterior walls of your home so that it slopes away for drainage. The roof may or may not be covered by earth.
Underground
To create a truly underground living experience, dig a large recess, construct your home below grade, and fill in the dirt around it. With this type of earth sheltered home, a central courtyard is usually located to allow access to air and light. Otherwise, skylights or sun tubesmay be installed to provide addition natural light.
Other Considerations
Before you build an earth sheltered or underground home, it is important to evaluate several factors. Consider the climate. The best climates in which to build these homes are those with extreme temperatures, particularly places that experience dramatic temperature swings from day to night. However, a humid climate can create additional condensation issues for an earth sheltered home.
Evaluate the location of the water table and frost line. If it is too close to the surface, then it might not be possible to build an underground home. Also consider the typography and which type of earth sheltered home would be the best fit for the site.The number one rule is to always send water in the opposite direction from your home!
Finally, you must determine whether the soil is stable enough to support the construction of an earth sheltered home. Sandy and gravely soils are the best, while soil containing a lot of clay is not suitable.
UNDERGROUND, WATERPROOF? WINDPROOF? EARTHQUAKE RESISTANT? SHELTER
Most of us are physically able to dig a hole by hand with a shovel, pick and pry bar. The hole has to be about twelve feet wide, by sixteen feet long. Depth is up to you. The deeper, obviously, the better. Save what dirt that comes out of the hole, as it can be used to cover your box. Based upon experience, in packed soil, with six inch rock, a four feet deep hole took me four days of unforgettable hard labor. Many hands make for light work. GET HELP!!
Check out this incredible way of becoming food independent on Backyard Liberty, and find out more about off-grid survival on Conquering the Coming Collapse.
The simplest waterproofing would be by using landscape plastic. Six mil would be the best. But if that’s not available, the heaviest you can get is better than none. You are going to wrap the entire box in plastic, then fill in the hole around the box and cover it also. This is why deeper is better. Before you begin putting your frame together, line the hole with the plastic. You will be assembling the frame over the plastic, so be careful not to puncture it.
The box, as shown in Figure 1, is made up of five ribs, and two ends.
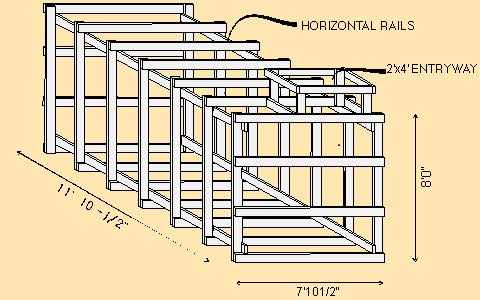
The box will be seven feet, ten and one half inches wide, eight feet tall, and eleven feet, ten and one half inches long. The shaft for the entryway is two feet wide by four feet long by two feet high.
MATERIALS
- 40 — 2 x 6 – 8′
- 17 — 4′ x 8′ x ?” Wafer Board (this is like particle board, but with larger chunks of wood. It’s cheap!!)
Here, in the extreme southeastern corner of Arizona, where building materials are a little more expensive than the bigger cities, the above materials priced out at $460.00. This does not include the hardware to fasten this thing together. A roll of black, 6 mil plastic, 20 feet wide by one hundred feet long is $50.00. If plastic is not available, no reason why a lot of paint and caulk won’t work just as good. Worse case scenario, and if nothing is available, don’t cover it.
As far as fastening this thing together, if I have power available, I plan to use 3″ deck screws to fasten the 2×6’s together and 2″ deck screws to attach the wafer board to the frame. If there is no power, then a good old hammer and nails will have to do. 10d cement coat box nails if possible, for everything. The problem with hammer and nails is that things tend to vibrate and loosen with such a frame. Have a good heavy brace on the other side of what you’re nailing, like an eight pound sledge hammer.

The horizontal members of the ribs and end pieces should be cut to seven feet, ten and one half inches long. All vertical members are to be eight feet. This allows for the overlap of the top panels over the side panels. See Figure 2 below.
Construct the ribs and ends, and using the horizontal rails, fasten the frame together. Everything must work in two feet increments, so the panels will match the frame. Be as meticulous as you can in making the frame square. Everything will fit better, if you do. Remember that your panels are four feet wide, and must butt together in the center of the rib.
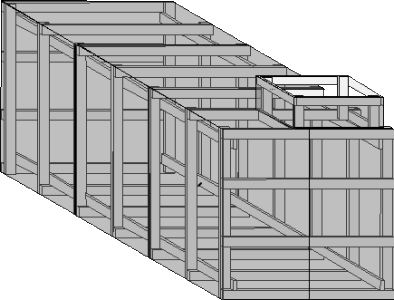
Once the frame is complete, your panels can be fastened to the frame. Do one end first, then the sides, working from one end to the other.
Before you do the remaining end and the top, cut your floor panels to six feet, ten inches long, place them inside, and fasten them down. Finish the remaining end.
You can now put the two whole top panels in place, then cut the last panel to fit around the entryway. The last panel you have will be used to cover the access way chimney. I did this to help keep debris from falling inside. Make the hatch cover three inches bigger than the outside of the chimney, and frame it with the last 2×6. It will cover the hatch, and fastened down with hook and eyes, will provide some security.
I deliberately left out any dimensions for the chimney. Measure and cut to fit.
When you have reached this point, and have a ladder inside for access, finish wrapping the plastic around everything. Back fill your dirt around the box and cover it about a foot and a half on top. Pack it down as best you can so it won’t blow away.
The inside can be finished with wood frame bunks for sleeping and storage. The exposed interior studs are easy to work with. Whatever frame work you may add inside, fasten it as much as possible, to the sides, top and/or bottom. This will serve to reinforce the entire structure.
Since the entire box is covered in plastic, it won’t breath very well. A lot of bodies generate moisture. With no where to evaporate, this will eventually become a problem in moister climates. The hatch ventilation may or may not be sufficient.
Benefits:
- Protection from the elements
- Energy conservation and consistent indoor temperature
- Privacy
- Soundproofing against neighbors and nearby roadways
- Extra green space and insulation provided by a living roof
- Low maintenance, little to no exterior materials
Other useful resources:
Blackout USA (EMP survival and preparedness)
Conquering the coming collapse (Financial advice and preparedness )
Liberty Generator (Build and make your own energy source)
Backyard Liberty (Easy and cheap DIY Aquaponic system to grow your organic and living food bank)