
Abundant clean water is widely recognized as one of the top survival priorities, with most survival instructors saying that you need at least a gallon per person per day for drinking and cooking.
The most common means of purifying water is by using a filter but there are other options like:
– boiling the water – it’s hard to purify enough water to meet a family or group’s survival needs and you would still have to filter the particles;
– chemical purification (such as using chlorine) – requires that you have enough of a stock of chlorine to last through the crisis.
And so it seems the bio-filter is your best option in a crisis. Bio-filters can easily be made out of readily available materials. They essentially duplicate the same process that a water treatment plant uses to purify water, but on a much smaller scale. This multi-stage process removes dissolved and suspended solids, as well as almost all waterborne pathogens.
The pathogens are the important part of water filtration. These pathogens are bacteria and protozoa which can infect our digestive systems, causing diarrhea and dehydration. Left long enough, they can cause death by dehydration. More than anything, they are the ingredient hiding in most fresh water sources, which can make us ill. So, that has to be our focus.
HOW A BIO-FILTER WORKS
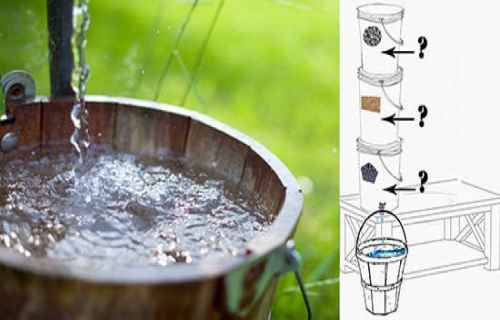
A bio-filter is a three stage filter, allowing each stage to provide a finer level of filtration.
- The first level consists of gravel and is there to remove larger solids, such as leaves, twigs, bugs and even pieces of feces that might be in the water.
- The second layer is sand, which will remove floating and dissolved particles of solids as the water passes through it.
- At this point, all that is left to be a problem is the microscopic pathogens, which are reduced by over 99 percent by the final layer, that of activated charcoal.
Activated charcoal is an amazing material. It is charcoal or carbon, in which the pores have been opened, expanding the surface area. The surface area of activated charcoal is a minimum of 500 square meters per gram and can be three times that much. That’s what makes it so effective. The large surface area traps the pathogens, preventing them from passing through.
Activated charcoal can be purchased commercially, but it can also be made. The easiest way to make it is to treat charcoal with a hot acid or a strong base. This will cause the pores in the charcoal to open up. Commercially, the wood is usually impregnated with acid, a base or salt, by soaking the wood in it, before burning. Then, as the wood burns, the pores are opened.

BUILDING A BIO-FILTER
There are a number of ways that you can build your own bio-filter. Some people try to make them in soda bottles or other small containers. The problem with this is that the filtration isn’t as thorough as it is for larger filters. More than anything, you want a thick layer of activated charcoal, so that it can remove the pathogens from the water. So, I recommend building it in three 5-gallon buckets.
To build your own bio-filter, you’ll need:
- 50 pound bag of sand
- 50 pound bag of pea gravel
- 25 pound bag of activated charcoal or carbon (volume will be about equal to the sand and gravel)
- Four 5-gallon buckets
- Screening (for replacing a torn window screen)
- Epoxy
- 3 ceramic wall tiles (like you would use in a bathroom shower)
- An electric drill with 1″ and 2″ hole saws
- Scissors
- Something to use for a stand, such as two cinder blocks standing on their end
By using three buckets, we are able to use plenty of material to ensure that the bio-filter will work effectively. This will also ensure that the filter will work for a long time, rather than becoming clogged up with garbage quickly. Basically, the bigger the filter, the longer it can filter effectively and the better a job it can do of filtering.
PREPARE THE BUCKETS
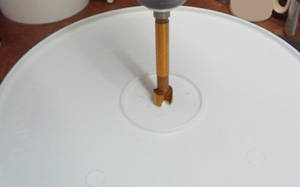
You are going to stack the three buckets up, with each of them taking on one part of the filtration process. To make this possible, we need to make a path for the water to pass from one bucket to the next. So, using the electric drill and the 1″hole saw, drill a hole in the bottom of three of the buckets. Then change over to the 2″ hole saw and drill a hole in the lids of two of the buckets. Leave the lid for the top bucket alone.
Cut a couple of 3″ squares of the screening material for each of the buckets. We’re going to use more than one to give it added strength. Epoxy these in place, on the inside of the buckets, so that they cover the 1″ holes you just drilled. You may need to use something to hold the screening down, while the epoxy is curing.
Place the ceramic tiles over the screening, shiny side up. You can use a small amount of epoxy in the corners
PREPARE THE FILTERING MEDIA
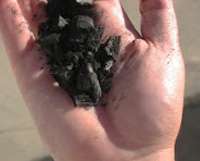
The activated charcoal needs to be crushed, if it isn’t already. You don’t need it to be powder, but you do need it to be small pieces, a couple of millimeters across. If you buy activated charcoal, it might already come this way, or in little sticks that are 2mm (0.08 inches) in diameter and 1cm long (0.4 inches).
Start by rinsing all three m filter medias (gravel, sand and activated charcoal). The sand and gravel will have dust and dirt in them and the activated charcoal will have charcoal dust in it. This needs to be rinsed out. Using the extra bucket, rinse five to ten pounds at a time, filling the bucket with water, swishing the media around in it and pouring the water out. Repeat this process over and over, until the water no longer becomes cloudy.
This is the boring part of the project, but have patience. If you don’t get all the dirt and dust out now, you’ll have to dump the first however many gallons of water from the filter, until it starts coming out clear.
As each batch of filter media is cleaned, put it in the appropriate bucket, gravel in one, sand in another and activated charcoal in a third, until all of it has been cleaned.

FINAL ASSEMBLY AND USE
Put the lids on the charcoal and sand buckets, snapping them into place. Place the two cinder blocks on end, as far apart as you can, while still allowing the opposite edges of a bucket to sit on them. Your bucket that contains the activated charcoal needs to be placed on the cinder blocks. Wiggle the bucket and blocks to ensure that they are stable.
Place the sand bucket on top of the activated charcoal bucket, being sure to center it. Check again to ensure that everything is stable. Finally, put the gravel bucket on top of the sand bucket to top off the stack. Don’t snap the lid onto the gravel bucket, just allow it to sit loosely to keep out dust and dirt.
You can put two to three gallons of water in the filter at one time, pouring it into the top (gravel) bucket and then capping it. I use a one gallon plastic pitcher, as a larger container would be a bit awkward to raise that high up above the ground. Place a container on the ground, between the cinder blocks, to capture the water as it is filtered through.
It should take about 1/2 hour for the water to percolate through the layers of the filter and come out the bottom. Don’t be surprised if the first several gallons come out murky. That’s just dust that you didn’t manage to rinse off. Keep filtering water and that will stop quickly. Then you’ll be able to safely drink the water that has been filtered through your bio-filter.

When the power goes out, your safety and comfort is important.
Protect your home or business with a new fully automatic standby generator. Maintain your security system, lighting and air conditioning to keep your family or business safe and comfortable through any power outage
Enjoy the total peace of mind that comes with knowing you have a constant and reliable power supply for your home or business in with a standby generator from Alternate Power Solutions. From everyday necessities like heating, cooling, refrigeration and lights, to daily essentials like cooking, laundry or kids bath times. Power outages are occurring more frequently than ever and lasting longer with devastating effects.
Stand up to unpredictable weather and unforeseen outages with the most trusted name in residential standby power with backup generators for homes. If the power ever goes out, your General standby generator goes on – automatically – protecting you and your home 24/7.

Books can be your best pre-collapse investment.
Carnivore’s Bible (is a wellknown meat processor providing custom meat processing services locally andacross the state of Montana and more. Whether your needs are for domestic meator wild game meat processing)
The Lost Book of Remedies PDF ( contains a series of medicinal andherbal recipes to make home made remedies from medicinal plants and herbs.Chromic diseases and maladies can be overcome by taking the remediesoutlined in this book. The writer claims that his grandfather was taughtherbalism and healing whilst in active service during world war twoand that he has treated many soldiers with his home made cures. )
Easy Cellar(Info about building and managing your root cellar, plus printable plans. The book on building and using root cellars – The Complete Root Cellar Book.)
The Lost Ways (Learn the long forgotten secrets that helped our forefathers survive famines,wars,economic crisis and anything else life threw at them)
LOST WAYS 2 ( Wordof the day: Prepare! And do it the old fashion way, like our fore-fathers did it and succeed longbefore us,because what lies ahead of us will require all the help we can get. Watch this video and learn the 3 skills that ensured our ancestors survival in hard times offamine and war.)
Survival MD (Best Post Collapse First Aid Survival Guide Ever)
Conquering the coming collapse (Financial advice and preparedness )
Liberty Generator (Build and make your own energy source)
Backyard Liberty (Easy and cheap DIY Aquaponic system to grow your organic and living food bank)
Bullet Proof Home (A Prepper’s Guide in Safeguarding a Home )
Family Self Defense (Best Self Defense Strategies For You And Your Family)
Survive Any Crisis (Best Items To Hoard For A Long Term Crisis)
Survive The End Days(Biggest Cover Up Of Our President)
Drought USA(Discover The Amazing Device That Turns Air Into Water)
By Rich M.
How often does the filtering materials bed to be replaced?
every 4 weeks