
If your home is connected to a traditional water supply, such as city pipes, you’re dependent on the rest of civilization for your water. If the system starts to break down or if someone breaks the connection to your water supply you’re lost. You have nothing for your family. But if you know how to dig a well you’ll be able to keep your family well-supplied with water throughout anything.
No matter what happens you’ll have your own supply and that’s an important thing when you’re not sure about the future. It’s also why you want to learn how to dig a well.
MAKING IT LEGAL
The first thing you need to do is make sure that you’re allowed to have a well on your property. If you live in the city, for example, or even in some townships you might not be allowed to because of laws and ordinances. You definitely don’t want to put in all that work on your well and then be forced to tear it down because you violated the law. So make sure you know where it can be, what size it can be and everything else you can find, because it’s going to be difficult to do, don’t make it be for nothing.
KEEPING IT CLEAN
If you’re going to be drinking out of your well you want to make sure the water is going to be clean. That means keeping it away from things like marshes, septic tanks and cisterns. It’s not always going to be easy to find the perfect spot but staying away from all of these things is going to be essential to keep your water clean and safe for drinking. But don’t just find the septic tank, follow the lines to make sure you’re at least 50 feet away from it at all times. Then make sure you’re staying away from electrical lines too.

Make sure you’re going at least 50 feet away from any buried fuel tanks or septic systems as well as 100 feet away from pastures and 5 feet from thinks like barns, building sites and anything else that could pollute your water. You’re also going to want a relatively deep well so if you reach water within 10 feet or less you need to find a different location for your well. Water that is that close to the surface is not going to be quite as clean as you’re looking for.

CHECK YOUR EQUIPMENT
In order to make your well you’ll need a lot of different types of equipment including your water system and storage. That’s going to mean pumps, filters and a tank. Each one is going to depend on what you need in your home, including the amount of yield you need and definitely the flow rate that you’re going to need based on your family and the details of your yard as well. It’s going to be important to the longevity of your pump that you know each of these details.

Choose a pump and lines that are going to support the amount of yield that you want but that aren’t going to end up running dry frequently. If your pump runs dry it’s going to start wearing out and breaking down a lot faster and that’s not something you’re going to want. Replacing a pump can be extremely expensive and difficult to do as well. So make sure it’s capable of operating at your high and low yield amounts at the same time so you won’t have any problems with use (or non-use).
If you’re looking to really get off the grid you may want to completely skip the pump and pipes and just dig out a well that you can lower a bucket into to get the water out. These wells are a little more old-fashioned, but if your plan is to make sure you have water access no matter what happens to the rest of the world they’re going to be the better option because you won’t have to worry about things like having power and keeping the pipes clear and ready for when you need them.
You’re also less likely to suffer damage somewhere between the well and your home that disconnects your water supply.
LAYING IT OUT
The most important thing is starting out right because if you don’t start out right you’re going to have a hard time getting your well back on track. So make sure you find the right spot for your well and that you test the area before you get started. If you can get a sample of the water in the area first you’ll be able to check for bacteria and other things in the ground that could make your water unsafe to drink from that area. It may take a few tries to find just the right spot with clear, safe drinking water.
Once you’ve found the right spot you’ll be ready to start digging. Just make sure that you have a large enough space for the well you want and also that you have all the tools you’re going to need. Your well is going to require at the very least a good quality shovel and a tool for you to test oxygen in the bottom of the well.

What you may not know is that the further down you get the less oxygen there could be and if you go into that well with nothing but carbon monoxide you could be in some big trouble. Testing your well before you start digging every day is going to be essential.
If you test the well and it’s low on oxygen all you need to do is wait a little while before you test again and go down. The carbon monoxide will fade off over a few hours and you’ll be okay to get started again. But if you don’t test it will cause you to pass out, and if someone doesn’t get you out it could even be fatal in the end. Never skip this extremely important step.
Start by marking out the entire outside edge of your well. You can use the same pick and shovel as well as your bucket to mark it as you will to start your digging process. Just keep in mind that this area needs to be not only big enough to let you get your bucket down easily to draw up the water, but also needs to be large enough that you can fit down inside of it to dig out the well. If you want help you’ll need it even larger.

MAKE IT THE RIGHT SIZE
Start by scoring out the size you want your well to be and then start actually digging. Try to dig evenly all the way across so you’re not going to end up standing in a small hole and trying to make it bigger. While you’re close to the surface you’ll probably also be better off trying to dig from outside of your circle. This will give you better leverage and much more space to throw out dirt and debris as you’re shoveling out one load after another, that way you can find the right spot to throw all that debris while you can still see it.
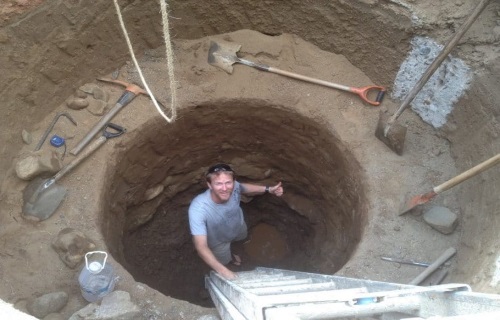
DIGGING IT DOWN
Once you start getting lower and it’s difficult to bend down to scoop out the dirt you’ll want to climb into your well to start digging. Make sure that you’re always digging with someone nearby in case of any problems. Hand dug wells can easily cave-in and if no one is nearby you could become trapped. As you dig make sure you keep watch on the walls around you. There should always be a ladder or rope in the hole with you to make getting out a quick and easy process and you’ll always want someone standing at the other end keeping watch as well.

When you get down as low as you want your well you’ll be able to brace up the walls and make sure that they aren’t going to cave in while you’re trying to use the well. Once it’s filled with water you’re not going to be able to get back down there to pull the rocks and debris out after all. So make sure you brace up the walls with stones, bricks or tiles of some type before you get all the way to the bottom of your well.
Of course it’s not easy to know exactly where you’re going to strike water but you should be able to get a good idea from your testing and work. You want to make sure you have the walls braced as you go but that you’ve put in place a more efficient and sturdy system before you get done because putting it in too early makes it more difficult to dig the well itself. Make sure you’re using a bucket to help get any of the excess dirt and materials out as you go, this is another reason to have someone else on the outside.

If you have to fill the bucket, climb up, pull up the bucket, dump it out and climb back down to start again it’s going to take you a very long time and you’re going to be putting a lot more hard work into it than you need to. The best thing is to get someone else to stand at the top and pull the bucket out when it’s full to dump and then send back down to you. You can even alternate between jobs to make it more efficient and a little less hard on your body.
When you start getting closer to where the water table should be making sure you’re watching carefully as you dig. Water will start to come into your slowly at first and that’s when you want to make sure you really start to pay attention. The first bit of water you may be able to get out and continue digging to make your well a little deeper and get better access to clean water. When the water starts coming in faster than you can bail it out that’s when you need to get out quickly.
WAITING FOR IT TO FILL
It could take some time for your well to fill up with water. Once it does you want to make sure you test it again. You don’t want to give your family something that is going to make them sick and even though you’ve already tested your groundwater, you need to make sure nothing has changed since you took that last test. It would really be unfortunate if you dug your entire well and then had to dig a new one because it was polluted, but it would be far worse to give your family tainted water.

Once the well is filled and you’ve tested it you’ll want to put in a cover. You can choose to build up on your frame for the well, adding more bricks and stones to make it taller up at the top and easier to get a bucket out of, or you can choose to just add a cap on the ground. Either way, you want to make sure you’re putting something there to keep your water protected from bugs or other falling debris that could contaminate your water source.
BUILDING THE FRAME
If you want to make your well look like the ones you’ve probably seen a million times in people’s yards you need to build it up above the ground. Now, those wells that you’ve seen are probably decorative wishing wells for their garden and not actual functioning wells, but you can make yours look like those ones if you want to. The key is making sure you build a solid and sturdy frame that can support some weight and provides a counterbalance for when you’re trying to pull up that heavy bucket of water from the bottom.

You can use stones or bricks to make the frame of the well but make sure you stick to the frame you’ve already built and that you’re securing the stones together. You can use cement for this part but make sure each layer of stones or bricks is securely fastened to the one before it before you move on to another one. You also want to make sure you keep each layer just as wide as the one below it. Don’t start making smaller circles or you could end up with something that caves in or doesn’t allow your bucket to get down to the bottom easily.
Once you have your frame as high as you want you’re ready to put on the rest. Add bars on either side to support the roof as well as the bucket itself. One bar should go on each side and then have one across the middle. The center bar is where you’re going to have your counter support when you’re pulling up the bucket after it’s filled with water. You want to make sure it’s securely fastened to make sure you don’t lose your bucket when it gets heavy and pulls against the crossbar.
If you choose you can even put in a rotating bar with a handle so you don’t have to pull the bucket up but can spin the handle to get it up instead. This makes the process a lot easier but it will take a little more work to put in place in the beginning. Just make sure you attach it firmly so it rotates easily but doesn’t come unattached. You’ll also need to attach one end of the rope to the frame and wrap it so that it can continue to twist easily. If you have to pull the rope up anyway you really haven’t saved yourself any work.

Finally, build a roof that can go over your structure. A roof or at least a lid for the top of your well is going to keep all that debris and everything else out. You want to keep your well clean and safe for your family to drink out of. If you don’t know what’s falling into it you can’t guarantee that you’re keeping up your end of that bargain. That’s why it’s important to build a roof and a good one that isn’t going to let anything through, similar even to the roof on your own home.
You can choose to make something with wooden slats or with a full roof with shingles. Either way you’ll need to build a frame for the roof and attach it to your two bars on either side. Once you do that you’ll be able to add on your form of shingles. Make sure your roof is slanted on the sides to form a peak in the middle.
That’s going to keep you from getting anything in the well and keep your roof from getting too much buildup and collapsing, which could hurt your well also.
If you use slatted wood make sure it’s done longways across the roof instead of going up and down.
That means the pieces of wood will run in the same direction as the crossbar that you put in for the bucket. They should also overlap slightly from bottom to top to make sure water and debris aren’t getting stuck in the cracks or creases. If you use shingles you’ll want to do the same thing. Make sure it’s layered well and that there are no gaps in the shingles. You’ll also want to put a special strip over the center peak so nothing gets down in between the frame.

USING YOUR WELL
If you want to use your well all the time you can do that. Going out to draw up another bucket of water can be difficult but it’s going to provide you with water that’s all your own and that you know doesn’t have added chemicals or anything else that your city water probably has. Your family will be kept a lot healthier and that’s going to be the most important part. Plus you don’t have to rely on anyone else for the water that you drink or worry about what could happen in the future.
If you plan to use your well only in the event of something happening to the rest of society you want to make sure you’re periodically checking it over to make sure there’s nothing wrong with the roof or structure of the rest of your well. If there is you want to fix it right away. You definitely don’t want something to happen where you have no water and then find out there’s a problem with your well. If you know early enough you can take care of the problem right away, before it becomes too much of a problem.

Preparing for a situation where society could be lacking and you could be on your own is definitely going to be important. It’s something that you need to consider as well because there’s no guarantee that everything will continue along the same path it has been.
Figuring out how to dig your own well is going to be instrumental if anything happens this way, so make sure you know what you’re doing before it comes down to that. You don’t want to be trying to dig a well after everything breaks down.
With these tips you should be able to get started on your own.
Of course, there are other ways to go about the process and you could choose to drill or put in a pump system that will bring the water to your house or make it easier to pull up from the ground, but this type of well is going to be your easiest to work if everything falls apart because it requires absolutely nothing but your own power, which is a good way to learn how to build a well and a great way to keep yourself and your family safe no matter what.
Survival Food Prepping Ideas/ULTIMATE Top Skills 2017
Discover how to survive: Most complete survival tactics, tips, skills and ideas like how to make pemmican, snow shoes, knives, soap, beer, smoke houses, bullets, survival bread, water wheels, herbal poultices, Indian round houses, root cellars, primitive navigation, and much more at: The Lost Ways
The Lost Ways is a far-reaching book with chapters ranging from simple things like making tasty bark-bread-like people did when there was no food-to building a traditional backyard smokehouse… and many, many, many more!
Here’s just a glimpse of what you’ll find in The Lost Ways:
From Ruff Simons, an old west history expert and former deputy, you’ll learn the techniques and methods used by the wise sheriffs from the frontiers to defend an entire village despite being outnumbered and outgunned by gangs of robbers and bandits, and how you can use their wisdom to defend your home against looters when you’ll be surrounded.

Books can be your best pre-collapse investment.
The Lost Ways (Learn the long forgotten secrets that helped our forefathers survive famines,wars,economic crisis and anything else life threw at them)
Survival MD (Best Post Collapse First Aid Survival Guide Ever)
Conquering the coming collapse (Financial advice and preparedness )
Liberty Generator (Build and make your own energy source)
Backyard Liberty (Easy and cheap DIY Aquaponic system to grow your organic and living food bank)
Bullet Proof Home (A Prepper’s Guide in Safeguarding a Home )
Family Self Defense (Best Self Defense Strategies For You And Your Family)
Survive Any Crisis (Best Items To Hoard For A Long Term Crisis)
Survive The End Days (Biggest Cover Up Of Our President)
Drought USA (Discover The Amazing Device That Turns Air Into Water)
Andrew McKay is a seasoned hunter and fisherman from Anchorage, Alaska. Andrew thinks that he is the luckiest person in the world, as he lives in the most gorgeous place in United States and does what he loves to do. As a member of Alaska Professional Hunters Association and International Hunter Education Association, he is always looking for the ways to improve his skills and to teach people around him. survival-mastery.com