
We haven’t always had a clear picture of what people really do in emergencies. Engineers designing evacuation procedures used to assume that people respond immediately when they hear an alarm, smell smoke or feel their building shake or their boat begins to list.
The prevailing psychological explanation for these kinds of behaviours – passivity, mental paralysis or simply carrying on as normal in the face of a crisis – is that they are caused by a failure to adapt to a sudden change in the environment. Survival involves goal-directed behaviour: you feel hungry, you look for food; you feel isolated, you seek companionship. Normally, this is straightforward (we know how to find food or companions?).
Do you know how to actually protect yourself during an earthquake or hurricane? What about a tornado or fire? You’ve probably heard lots of conflicting information over the years. We hope you won’t ever need it, this start-to-finish guide to handling disasters will help you remember what you should really do during an emergency and afterwards to recover as quickly as possible.
Make sure you have a disaster plan. As with our other disasters, a disaster plan for an hurricanes, earthquake is important. However, because earthquakes can strike suddenly and without warning, and in some cases they can lead to other problems like fires or tsunamis, it’s critical to have a disaster plan for your household and family, and to have practiced it so it’s second nature when you need to act on it.
During: Hunker Down, Evacuate When Ordered
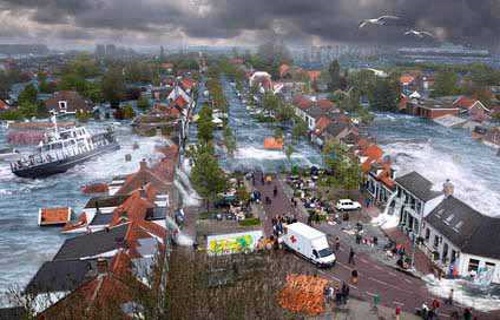
Even weaker hurricanes are still hurricanes, and can cause serious damage. If you haven’t been told to evacuate, you’re likely safe sheltering in place, but you should still be alert and aware of what’s going on outside. The order to evacuate can come quickly, even if everything else seems like it’s going well. Remember, in many cases it’s not the hurricane itself that does the damage, but the storm surge—or water that’s pushed ashore by the hurricane’s fierce winds and motion.
How to prepare before the disaster
The time to prepare your home is long before a disaster or severe weather event happens. It’s vitally important to make a plan and have the supplies necessary to either take shelter after a storm, or evacuate on short notice.
Darryl Madden, FEMA’s Ready campaign director, said the most important thing to do is to plan ahead.
That includes knowing what to do in several disaster scenarios, from tornadoes to hurricanes to wildfires, and making a plan with your family.
He said it’s a good idea to sit down and imagine what would happen – and what you would need – if the power went off for an extended period of time.
He also said communication is vitally important, whether you need to call emergency services or get in touch with relatives, friends and neighbors to let them know where you are, and how you’re doing.
“Have a communications plan,” Madden said. That includes things like an NOAA weather radio and phone access.
He said it’s best to get a crank-powered radio so it doesn’t rely on any energy other than what you can generate yourself in case the power goes out. Another thing you want to look at is a solar-powered phone charger, so if you’re without power for an extended period of time, you can still communicate.
Next, you need to have the supplies necessary to survive at least 72 hours on your own. In heavily hit or rural areas, it can take rescue personnel a long time to make it to you.
“You want to have three days’ worth of water for each individual,” Madden said. “Any resources that they need, obviously, food and water is their primary concern.”
He said the most important things are water, a first-aid kit and a flashlight, followed by necessary medications and specific needs such as formula and diapers for small children. He also said non-perishable food is not a bad idea to keep on hand.
“It’s not something you have to focus on every time, just you know when you go to the store, grab a couple of things that will keep,” he said, and advised storing the food somewhere besides the pantry so it’s out of the way.
He also said that people with critical medical conditions that require special treatment, such as dialysis patients, should get in touch with their local emergency manager, fire department, or FEMA to inform them ahead of time about your condition. That way emergency personnel know where you are in case of a disaster.
Emergency water
An emergency water supply is one of the most important things you can have in your home during and after a disaster.
Oftentimes, blackouts prevent water treatment facilities from operating properly and having an emergency clean drinking water supply can help you stay-put and ride out a disaster at your home without worrying about where your next drink will come from.
Dehydration is common during disasters and having a supply of emergency water can prevent this from occurring. This is especially important for those of us who have medical conditions such as diabetes and hypertension.
Keep a supply of emergency water in your home, and your car. One gallon of water per person per day is best, but in a pinch, a five to seven gallon container can usually get you by until you find a clean water source. Use clean water bottles and containers. If you must, clean out your bathtub and fill it up with water!
Emergency food
You need to have at least a week of emergency food to ride out a large scale disaster. 72 hours is NOT enough. Most of the Katrina survivors I encountered in 2005 needed emergency food rations nearly two weeks AFTER the event.
Buy non-perishable canned items, preferably food you don’t need to cook but is high in nutritional content. Freeze dried hikers meals are a bit on the expensive side but delicious and easy to prepare. Military Meals Ready To Eat (MRE’s) are also another option. You can also learn how to dehydrate and can your own food too.
Back To Basics: How To Make Jerky For Survival
VIA : By Theresa Crouse
Jerky can be made from just about any type of lean meat that you can think of. It’s a great food for a survival situation because it’s lightweight, nutritious and energy-dense. It’s also easy to make; the Native Americans and many other civilizations were making it long before food dehydrators and commercial packaging were in existence.
I make this all the time, or at least I did when I still had kids in the house. The only problem that I ever had was that even if I made 3 or 4 pounds of it (which is a LOT of jerky) there still wouldn’t be any left by the time I got home from work every day. I got pretty good at taking out my own stash before I even let the herd of teenaged boys in the house know that it was done!
Back to the topic though. There are basically two ways to flavor your jerky. You can use a wet marinade or a dry rub. If you’re using a marinade, you need to let the meat soak in it for at least 24 hours if you want it to absorb enough flavor.
A good recipe for teriyaki-style jerky is to use equal parts of Worcestershire sauce and soy sauce, then add in some garlic powder, salt, black pepper and, if you’re like me and like it a bit spicy, a bit of cayenne powder and some crushed red pepper flakes. Make enough marinade to cover the meat and stir it several times so that the meat in the middle gets marinated too.
If you’re using a dry rub, just add it to the meat an hour or so before you start the dehydration process. The recipe for this one is all on you. There are a kazillion Cajun, Mediterranean, Italian and American rub recipes out there that you can pick and choose from.

Cutting the Meat
The first step to making your own jerky is choosing the right meat. You need for it to be lean and as free of tendons as possible. I like to use a rump roast. Yes, it’s expensive but it makes good jerky. Venison jerky made from rump roast is amazingly delicious and much better for you than beef because it has a much lower fat content.
Low fat content is a good thing not only from a health perspective but also from a preservation perspective. The leaner your meat is, the longer it will take for it to go rancid.
In order to get the amount of jerky that you want, assume that you’re going to lose half the weight of the meat if you leave your jerky a bit moist and 2/3 of the weight if you make it completely dry. I suggest making it a bit moist if you’re going to eat it quickly but making it dry if you’re trying to preserve it for survival purposes.
Now that you have your meat, you need to slice it. Your butcher may do this for you but I prefer to do it myself. Unlike when you’re cutting steaks, you’re going to cut the meat WITH the grain. Figure out which way the grain goes on the roast and that’s the direction that you’re going to cut. Next, you’re going to need an EXTREMELY sharp knife. I use my butcher knife.
I’ve found that it’s easier to cut the meat if it’s extremely cold or even partially frozen. Don’t try to cut it if it’s completely frozen unless you want to lose a finger. Also, if you have to force the knife through the meat, it’s going to be hard to get the proper thickness.
You want each slice to be as close to exactly the same thickness throughout as possible. Shoot to make each slice no thicker than a quarter inch thick. This will give you plenty to chew on without worrying about moisture still being locked in the center of the slice to make your meat go rancid faster than anticipated.
Once you have the meat cut, prepare it as I explained above either using your marinade or your rub.
Video first seen on Cabela’s Outdoor Cooking Channel – Cook with Cabela’s
Drying the Jerky
If you’re using a food dehydrator, this is the easy part. Just put the meat on the trays in a single layer and turn the machine on. I’ve found that the bottom layers dry faster so I prefer to switch the layers around a bit and as some of the pieces are done, I consolidate the slices onto fewer trays until it’s all finished.
If you’re using the oven , you’re going to need to do smaller batches because you’ll be using a cookie sheet and you won’t be able to fit as much on it as you can a dehydrator. Place the meat on the tray in a single layer. An alternative that I’ve seen to using a cookie sheet in the oven is to hang the slices from the racks by using a toothpick inserted through one end of the meat and hooking it between the slats of the rack. Personally, this seems like it would be really messy.
Either way, set your oven to 150 degrees and cook for about 2 hours. Check it and, if you’re using a cookie sheet, flip the meat over. Cook for another two hours or until meat is done.
You’ll know that your meat is done when you can bend it and no moisture beads out of the crack. Again, if you want it a bit moister to make it less leathery, stop at this point. If you want to completely dry it out, cook it until it cracks when you bend it sort of like stiff leather would. It’s not as tasty but it will last longer.
Once your jerky is done, (assuming you have any left after the family figures out that it’s finished) you can either choose to eat it now or preserve it. You can preserve it by vacuum sealing it into bags or by dry canning it.
If you’re in a SHTF situation and don’t have access to an oven or dehydrator, follow all instructions up to the point of cooking. Then string it onto a piece of wire and hang it over a fire to dry. Remember to keep it high enough that it’s only getting low heat. You want to dry it out, not cook and burn it.
Now that you know how to make jerky, go give it a shot then come back and share your results with us. If you’re an old pro at making jerky at home, share some of your tips with us!
Interested in gaining your food-independence? CLICK HERE to learn how!

Books can be your best pre-collapse investment.
The Lost Ways (Learn the long forgotten secrets that helped our forefathers survive famines,wars,economic crisis and anything else life threw at them)
Survival MD (Best Post Collapse First Aid Survival Guide Ever)
Conquering the coming collapse (Financial advice and preparedness )
Liberty Generator (Build and make your own energy source)
Backyard Liberty (Easy and cheap DIY Aquaponic system to grow your organic and living food bank)
Bullet Proof Home (A Prepper’s Guide in Safeguarding a Home )
Family Self Defense (Best Self Defense Strategies For You And Your Family)
Survive Any Crisis (Best Items To Hoard For A Long Term Crisis)
Survive The End Days (Biggest Cover Up Of Our President)
Drought USA (Discover The Amazing Device That Turns Air Into Water)