
How to make fermented garlic honey; a tasty condiment with cold and flu combatting abilities, immune-boosting properties, and an impressive shelf-life; perfect for enjoying for years to come! Best of all, all you need is two ingredients and a sterilized jar!
Whether you want to consider this as fermented garlic honey or honey fermented garlic, the process and dish are the same. By combining fresh garlic with raw honey and allowing it to ferment, you end up with garlic that is sweetened and mellowed and garlic-infused honey that not only tastes good but packs a punch of health benefits too!
When it comes to garlic, in my opinion, you can never have too much. I recently posted recipes for pickled garlic and the TikTok trending spicy pickled garlic. I’ve previously shared recipes for garlic confit and garlic toum (a Lebanese garlic sauce). Now it’s the turn of this garlic fermented in honey with the ultimate shelf life.
Enjoy it when you feel a cold coming on or have a sore throat, or drizzle the honey over pizza, veggies, add into marinades and dressings, or to a whole array of other dishes (keep reading for suggestions!)

There may be a weeny bit of a learning curve when it comes to fermented products, but (in my opinion anyway), the results are worth it. Just like homemade kombucha, this fermented garlic is something I not only enjoy making but enjoy eating too (and there are so many ways to use it too!).
Not only is this honey garlic ferment shelf-stable, but unlike other methods to preserve garlic (which often carry the risk of botulism), for this method, it is improbable. The acidity of honey means that bacteria are largely unable to survive and multiply, making this honey’s shelf life potentially endless. That is if it’s stored with a tight lid on at all times when not being used.
GARLIC AND HONEY HEALTH BENEFITS
Both garlic and honey have been used for many decades (or longer) for traditional remedies. When combined, the two provide anti-bacterial, anti-viral, and immune-boosting properties. This makes this fermented garlic perfect for enjoying during cold/flu season!
In fact, the antimicrobial properties of honey make it seem like an unlikely choice for a fermentation medium. However, fermenting garlic in honey allows the garlic to release enough juices into the honey to allow for the fermentation process.
On top of the above, several studies have found that garlic may also be beneficial towards heart health by lowering blood pressure, cholesterol and preventing clotting and hardened/stiff blood vessels.
More so, the high antioxidant content in both ingredients means that it may help to protect our brains from inflammation-based diseases such as dementia and Alzheimers.
THE INGREDIENTS

THE INGREDIENTS
- Raw honey: make sure to use raw, unpasteurized honey. The process won’t work if it’s not raw, as the microbes will have been killed off in the pasteurization process.
- Garlic: it’s best to use the freshest garlic you can find for the quickest and best fermentation results.
You may also like this chili and garlic-infused honey.
HOW TO MAKE FERMENTED GARLIC HONEY
STEP 1: PREPARE THE GARLIC
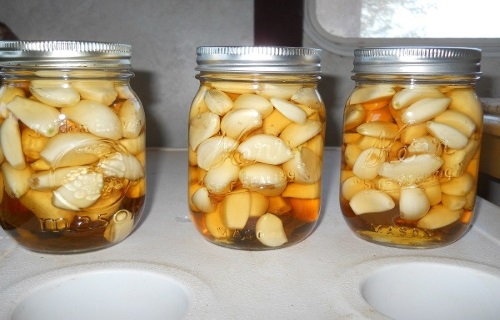
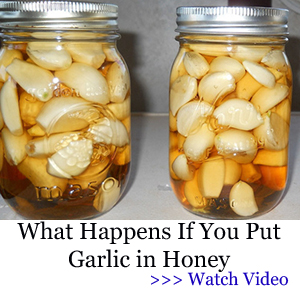
First, you’ll need to peel the garlic using one of several methods. Then transfer the peeled garlic cloves to a sterilized glass jar with an airtight seal.
It’s a good idea to lightly crush or chop the cloves in half to speed up the fermentation process. Alternatively, you could prod the whole cloves a few times – to encourage the release of their juices into the honey.

STEP 2: ADD THE HONEY AND FERMENT
Then, fill the jar with honey, mix it, and then seal it.
Once sealed, turn the jar upside down (this is why a good seal is essential) and set it aside. Place a plate beneath the jar, just in case, though I’ve never had issues with overspill/leaks.
For two weeks, you’ll need to ‘burp’ the jar daily. To do this, open the lid to allow any build-up of gases (CO2) to release and then close, shake (or stir it), turn upside down, and set aside again.
Be quick while doing this as too much oxygen introduced to the honey and garlic at this stage can impact the fermentation process. Just a quick opening of the lid should be enough to release the gases.

During this time, you’ll likely see “activity” in the form of foaming or bubbling within the jar. The amount can vary, and it won’t always be majorly noticeable. The honey will become more watery, too, as the garlic releases liquid into the mixture.
After two weeks, the fermented garlic is ready to enjoy, though I’d wait a month for even better results! If you don’t plan on using it very often, then it may still need burping occasionally, though the build-up of gases will slow down over time.

HOW TO STORE?
Store the jar of fermented garlic and honey in a cool dark location away from direct sunshine – like a kitchen cupboard or pantry. As long as you store the honey with an airtight lid and don’t allow any moisture to enter the jar, then the garlic honey can last for years!
Note that it’s normal for the honey and garlic to darken over time – it’s even normal for your garlic to turn blue/green (though this isn’t typical for a honey ferment) – it’s a natural reaction.

WHAT ARE THE FERMENTED GARLIC HONEY USES?

There are tons of ways to enjoy this garlic fermented in honey. Here are just a few of my top suggestions.
- Eat one of the honey-soaked garlic cloves when you feel a cold/sore throat coming on.
- Eat a spoonful of the garlic-infused honey for the same reason as above.
- Use the infused honey for salad dressings and marinades.
- Drizzle it over cheese – like goats cheese, ricotta, etc.
- Spread it over toast, cornbread, pretzels, and breakfast muffins, etc.
- Drizzle over pizza.
- Use as a glaze for your favorite protein: meat, fish, or tofu!
- Drizzle some over roasted or stir-fried veggies.
- Use the mellowed garlic in dips like hummus or this white bean dip.
Let me know in the comments how else you’d enjoy the honey, garlic, or both combined!

FAQS
Is there a risk of botulism with fermented garlic honey?
While the risk is very minimal, you can test the garlic honey mixture if you are concerned. Botulism can only survive in specific environments and acidity levels. To test this, you can use a pH strip (or monitor). Any reading under 4.6 is considered safe. If it’s slightly above that, you could add a little apple cider vinegar to the mixture to lower the pH before consuming it.
My garlic isn’t sinking, why?
Garlic can take some time to sink in the mixture as it releases its juices into the honey – usually based on how fresh it is (though usually between 1-2 months). It should eventually sink, though. The aim at the beginning is for the garlic to be covered by the honey as much as possible to prevent spoilage.
Can I use my first batch of garlic honey as a ‘starter’ for the next fermented garlic?
Unlike yogurt, where the microbes in the ‘starter’ will help kickstart the new mixture, this doesn’t work in the same way for fermented garlic honey. The fermentation process goes through several stages, and I’m afraid that ‘skipping’ some or trying to ‘hack’ it could not only impact the ferment but possibly cause food safety issues. I don’t know this for sure – but better safe than sorry!
Do I need to cut/crush the garlic?
It’s not 100% necessary, though it can help to speed up the fermenting process. This is because the garlic releasing its liquid into the honey is part of the fermentation process. If you want to have whole cloves but still ‘quickstart’ the process, you could use a fork or knife to prod the cloves a few times.
Can I use pasteurized honey for fermented garlic?
No! Unfortunately, pasteurized honey kills off all the microbes that are needed for the fermentation process to work. Please use raw, unpasteurized honey.
Can I use maple syrup instead of honey?
This isn’t something I’ve tried so I can’t say for sure. The water content within maple is quite a bit higher than honey so that will impact its shelf life. The pH level is also a lot higher than honey and so may not be safe in terms of the risk of botulism unless extra ingredients like vinegar and other acidic elements are added to reduce the pH.
RECIPE NOTES AND TOP TIPS
- To avoid manually burping the jar: you can use a self-burping bale wire jar (fido jars) or purchase jars with airlock lids or other ferment lids. Just make sure to still shake the jar to keep the garlic submerged.
- Using fermenting weights: one way to make sure the garlic stays submerged under the honey throughout is to use fermenting weights. You can buy fermenting jars that come with weights to fit those jars specifically.
- The fresher the garlic, the better: use the freshest garlic possible as it will produce the quickest and best ferment.
- Leave a little headspace: some batches may foam up more than others and cause overspill. For that reason, I always leave headspace at the top of the jar.
- The perfect fermentation period: the best time to begin enjoying your fermented garlic honey is when the main fermentation is over. It won’t be as foamy, the honey will have thinned out and started to darken, and the garlic will have sunk to the bottom of the jar. This usually takes between 4-6 weeks. Though waiting 3 months is even better. If you have the patience, I recommend waiting a year for a genuinely delicious surprise!
- How much honey to use: while it’s important to use enough honey to submerge the garlic entirely, there IS such a thing as too much honey. I recommend using around a 1:1 ratio of garlic to honey. If you use too much, then the anti-microbial properties in the honey will essentially ‘smother’ the garlic. If you want to add more honey, you may also need to add a little water to the honey to kickstart the fermentation process.

HONEY FERMENTED GINGER AND LEMON
How to make honey fermented ginger and lemon – a common combination for combatting cold/flu symptoms and tasty addition to meals, dressing, and drinks. Best of all, once prepared, this fermented lemon and ginger will last several months and the process couldn’t be simpler (even for fermenting newbies!).
.)
I know, if you’ve never tried fermenting before, you might be mistaken for thinking it’s a terribly technical, difficult process. While that may be true in some cases (like caring for kombucha SCOBYs), honey ferments are surprisingly simple! It’s fairly hard to “mess up”, and requires no fancy equipment/tools! I’ve already shared a method for honey fermented garlic, now it’s the turn of this honey fermented ginger and lemon!
The combination of honey, lemon, and ginger is a favorite of mine (especially for its immune-boosting properties, like in these ginger lemon and honey immunity shots). Not only does it taste great, but it makes for a great cold/flu/sore throat-busting tonic. Plus, the pollen found in raw honey may be beneficial for those with allergies. The fermentation helps to increase those benefits further too, plus it has months of shelf-life!
.)
One of my favorite ways to soothe myself at the first sign of illness is to whip up a big mug of ginger tea with lemon and honey. By preparing this honey fermented ginger, you can avoid having to do this from scratch each time! However, you don’t have to be ill to enjoy this honey and lemon fermented honey either.
The combination of lemon, honey, and ginger is also a delicious addition to so many other meals, dressings, sauces, marinades, etc! (Suggestions listed below!). Looking for more ways to enjoy ginger? Why not learn how to make ginger juice, powder, crystallized ginger, syrup, or even a silky ginger pudding.
THE BENEFITS OF GINGER AND HONEY WITH LEMON
I’ve talked about the benefits of all three ingredients in several places across my blog. For example, in my post for ginger turmeric and lemon immune-boosting shots, lemon, ginger, and cayenne immunity shots, and my recently posted honey fermented garlic. So head on over to find out more there.
.)
It’s important to note that all three ingredients have a very long list of potential health benefits. Ginger alone contains anti-inflammatory and antioxidant properties and is known to help remedy stomach issues and fight colds/flu while also improving brain and heart health.
Lemon is equally brilliant for your immune system and packed with antioxidants and Vitamin C. It’s also a natural detoxifier and has antibacterial and antiviral properties.
Meanwhile, raw honey boasts similar benefits including antibacterial/antiviral and antioxidant properties. It also contains gut-friendly enzymes that are good for promoting healthy gut flora and can help boost immunity and fight infection. You can read more about the top health benefits of raw honey here.
So, as you can imagine, the lemon ginger honey combination is a goldmine of health benefits!
.)
HOW DOES THE HONEY FERMENTATION WORK?
The way the fermented honey works is all down to the ingredients used. Raw honey (that’s unpasteurized) still contains the various naturally occurring enzymes and, specifically yeast. When combined with enough water to reach a moisture content of 19-20%, this kickstarts the fermentation process of the honey. In a commercial way, this is how “mead” is made, eventually.
While honey already contains around 16/17% water, the sugars in the honey pull the liquid from the ingredients placed in it (in this case ginger and lemon), which helps reach the 20% and begin fermenting. If your ingredients aren’t “wet” enough, you can top it up with extra water, too! (See I told you, easy!) This process is further helped by extra natural yeast which is found on the vegetables and fruits added to the fermenting honey.
Once the fermentation process begins, your ingredients are becoming preserved and you get a delicious fermented honey lemon ginger! Simple!
THE INGREDIENTS
.)
- Honey: it’s important to use raw, unpasteurized honey. Pasteurized honey won’t ferment as the microbes are killed in the processing.
- Ginger: fresh ginger, please! It’s recommended to use organic ginger, as non-organic ginger can go through processing that reduces (or eliminates) the yeast on it (that is needed to start the fermentation).
- Lemon: I include whole slices of lemon in the honey ferment, so it’s best to use unwaxed lemon! Remember that different lemons are more tangy vs sweet. If you’d prefer to use a sweeter variety, I recommend Meyer lemons. You can also use limes.
You also need a jar. Make sure to use one that is wide enough to fit whole slices of lemon and has a lid. A wooden spoon or skewer is also a good idea for mixing the fermenting ingredients (avoid metal).
HOW TO MAKE HONEY FERMENTED GINGER AND LEMON
STEP 1: PREPARE THE GINGER AND LEMON
First, sterilize the jar you plan to use for the fermented honey recipe. To do so, wash the jars and lids in hot soapy water, rinsing well. Then place the jars (no rubber or plastic parts) in a pre-heated oven for ten minutes at 325ºF/160ºC to completely dry. Some dishwashers also come with a “sterilize” setting.
Wash the lemon and peel the ginger. Then, with a sharp knife or mandoline (even better for even slices), thinly slice the lemon and ginger. I used a peeler for the ginger, but thicker knife/mandoline slices will work too.
.)
STEP 2: FILL THE JAR
To layer the jar, first place some ginger, then a couple of lemon slices. Repeat until all the ingredients are in the jar.
Then pour the honey over the ginger and lemon, making sure it fully submerges the ingredients. Also, use a clean spoon/skewer to gently shake/move the ingredients around, to make sure the honey gets to the bottom of the jar.
Alternatively, you can drizzle 2-3 tablespoon of honey at the bottom of the jar and between each layer. That way, it’s easier to make sure the ingredients are fully coated with it.
Finally, seal the jar.
.)
STEP 3: LEAVE IT TO FERMENT
Leave the ginger honey lemon mixture to ferment for two weeks. During this time, you’ll need to “burp” the jar daily. Open the lid for just a second to allow any built-up gases to release.
It’s a good idea to slightly shake the jar too or flip it upside down (with a plate/bowl beneath). I prefer to shake/flip rather than stir (with a wooden spoon) since an excessive amount of oxygen can impact the fermentation process.
After two weeks, you can stay enjoying the fermented lemon/ginger. However, it will taste even better at the one-month stage!
.)
HOW TO MAKE AHEAD AND STORE
Once the fermented lemon and ginger taste as you’d like, I recommend transferring the jar to the fridge. This will slow the fermentation (almost halting it entirely) and is best for those who want to use it slowly over several months (6 months or more). You could also keep the ferment in a cool, dark location like a kitchen cupboard. This way it will continue to ferment at a faster rate and the flavor will develop and change and even become slightly boozy (like mead). I do this when I plan on using it within a couple of months.
Just note that the flavor will become more bitter over time due to the lemon pith.
Like most fermented foods, just keep an eye out for bad smells, mold, and other signs of spoilage. This doesn’t happen often, but if it does, it’s time to start a new ferment.
.)
HOW TO USE LEMON AND GINGER FERMENTED HONEY?
While I know I’ve already made it clear that this concoction is perfect for when you’re feeling under the weather, there are tons of ways to enjoy this honey fermented lemon and ginger.
- Ginger tea: add around 1 tablespoon of the mixture (honey and ginger) plus a slice or two of lemon to a mug/teacup and top up with water. If you’d prefer it sweeter/more flavorful, then simply add a little more.
- Hot toddy: turn your healthful ginger tea into an adult treat with the addition of a splash of whiskey and a cinnamon stick (or a dash of cinnamon).
You can also add this fermented honey to smoothies, juices, salad dressings, and marinades.
For sweeter treats, I happily drizzle this over a breakfast bowl with yogurt (dairy or dairy-free like coconut or almond yogurt) and granola. You can also enjoy it over ice cream, drizzled over oatmeal (or baked oatmeal), over fruit crumble, pancakes/waffles, scones, etc.
Let me know in the comments how you enjoy using this honey fermented ginger and lemon!
Can I use other fruits for fermented honey?
Yes, there are all kinds of honey ferments you can make with various fruits and vegetables including apple, pear, cherries, blueberries, pomegranate, mango, peach, plum, onion, peppers, etc.
You can also use dried fruits like dates and figs. Though you’ll need to add an additional 3% water (based on the weight of the fruit), to raise the water content to the necessary level to start fermentation.
Do you know about the gift of nature to save the life of people from various health problems and make them feel secure by curing significant issues? How to live healthy in this world without having chronic diseases or illness or any other health issues which may hurt you physically and mentally? Due to dense population, people are trying to demolish the forest, garden areas to create shelter, so they forced to destroy the nature’s gift such as natural ingredients, secret medicinal herbs and more which are grown in wild forest, mountains and other places. When you read this review entirely, sure you will get chance to know about secrets medicinal ingredients, herbs and more used by our ancestor to get back the lost health without losing your life. Claude Davis was highlighted all the stuff in the form of the e-book The Home Doctor filled with a list of natural ingredients and remedies that you can quickly grow in the backyard or at free space to include it in your routine diet or external usage to get well soon.
When is the fermented ginger and lemon ready?
There is no cut-and-dry answer to this. Some say that when your added ingredients (lemon and ginger) have naturally sunk below the honey – which can take several weeks to a month, others say that it’s simply ready when you decide it tastes best. I tend to leave it between 2-4 weeks to ferment before starting to enjoy it. The longer it sits, the more the flavor will develop!
I recommend using a wooden spoon to give it a taste at two weeks – if you like it, transfer it to the fridge to slow the ferment. If not, keep at room temperature to further ferment for 1-2 weeks and test again.
How can I be sure the lemon and ginger are fermenting?
During the fermentation process, you should notice the honey begin to thin out and you may notice some bubbling (but not always) in the honey (of the built-up gases) and the ingredients beginning to naturally sink below the honey. If the honey has thinned but you aren’t noticing any other signs of fermentation, you may want to add 1-2 tablespoon of water, mix, and continue (as there may not have been enough water to properly encourage the fermentation). You could also add in a little apple cider vinegar which can also help kick-start fermentation, as well as bring the pH lower.
Do I need to burp the jar daily?
There is some differing guidance on this. I made sure to do this with my first honey ferment (this garlic honey ferment) when I noticed just how bubbly it became while fermenting (after having a bottle of kombucha explode in the fridge after forgetting to burp it, I’m on the “better safe than sorry” camp now).
While, technically, some say this isn’t necessary since honey ferments contain such low levels of water vs. honey (which means slower, gentler fermenting), I still like to do it daily for the first 2-3 weeks and then once a week or so after that. If you don’t want to do it daily, feel free to do it every other day (or experiment). Just beware of the potential of exploding jars if you never burp it!
RECIPE NOTES
- Burping the jar: if you don’t use the fermented lemon and ginger often, it’s a good idea to burp the jar occasionally still. After the first 2-3 weeks, the main “activity” will slow down so daily burpings aren’t necessary.
- The honey thickness: it’s important to note that the honey will become “thinner” during the ferment as the added liquid from lemon and ginger enters the honey. This is normal!
- Don’t fully fill the jar: leave some headspace for the mixture to bubble up and expand as the liquid from the ginger and lemon releases into the honey. The ingredients should be fully covered but if you add too much, the liquid content won’t reach 20%!
- Using other fruits/veg: feel free to try this fermented honey method with other ingredients. Check the FAQs for a list of suggestions.
Books can be your best pre-collapse investment.
Carnivore’s Bible (is a wellknown meat processor providing custom meat processing services locally andacross the state of Montana and more. Whether your needs are for domestic meator wild game meat processing)
The Lost Book of Remedies PDF ( contains a series of medicinal andherbal recipes to make home made remedies from medicinal plants and herbs.Chromic diseases and maladies can be overcome by taking the remediesoutlined in this book. The writer claims that his grandfather was taughtherbalism and healing whilst in active service during world war twoand that he has treated many soldiers with his home made cures. )
Easy Cellar(Info about building and managing your root cellar, plus printable plans. The book on building and using root cellars – The Complete Root Cellar Book.)
The Lost Ways (Learn the long forgotten secrets that helped our forefathers survive famines,wars,economic crisis and anything else life threw at them)
LOST WAYS 2 ( Wordof the day: Prepare! And do it the old fashion way, like our fore-fathers did it and succeed longbefore us,because what lies ahead of us will require all the help we can get. Watch this video and learn the 3 skills that ensured our ancestors survival in hard times offamine and war.)