
Traditional Food Preservation Methods Are Returning In Popularity Among Americans
We come across articles from newspapers printed in the 1800’s that contain recipes and cooking tips that you might find interesting. Some have become our favorites and others are simply amusing.
Traditional food preservation methods are returning in popularity among Native American tribes and communities in South Dakota. Elders are teaching youth about the traditional practice of sun-drying corn and wild berries. This tradition brings families together and can be passed on from generation to generation. Buffalo meat was also traditionally sun-dried; this practice is now more commonly done in a food dehydrator. Jerky or bapa (dried buffalo meat used in soups and stews) and sun-dried corn and wild berries are healthy foods that provide sustenance to the Native American diet.
Research funded through a USDA Food Safety Initiative grant identified traditional Native American methods of food preservation. Members of the Sisseton Wahpeton Oyate (tribe) and the Cheyenne River Sioux Tribe were interviewed to determine methods currently being used to dry meat, corn, and berries. As the interviews were being conducted, a strong sense of family and tradition in this simple method of preserving was apparent. Of the individuals surveyed, 93% learned the method from their elders (mother, father, aunt, uncle, grandparent). The average age range of the participants was 41–50; 33% reported they usually worked alone, indicating the traditions are not being passed on to youth. Modern methods of drying meat, usually using a food dehydrator, included shortcuts that may increase the risk of contamination to the food product.
RELATED : Skills Of The Native Hunters – Pemmican The Ultimate Survival Food
Guidelines for Storing Meat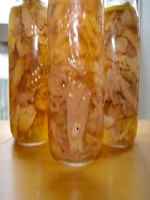
In the 1800’s people in the West didn’t have a refrigerator or freezer to keep their meat fresh, so they used other means. Below are summer guidelines for storing meat. Incidentally, we don’t recommend your trying these methods today. They are not that dependable.
Cover the meat with sour milk or buttermilk and store in a cellar.
In areas where the nights are cool, hang the meat in the open from a tree so any breeze can pass around it. Make sure the meat is brought inside at dawn. During the day wrap the meat in a tarp and store in a shady place. Make sure the blow flies don’t deposit eggs on the meat.
Keep the meat away from rain and damp nights. Any meat that gets wet must be cooked or jerked immediately.
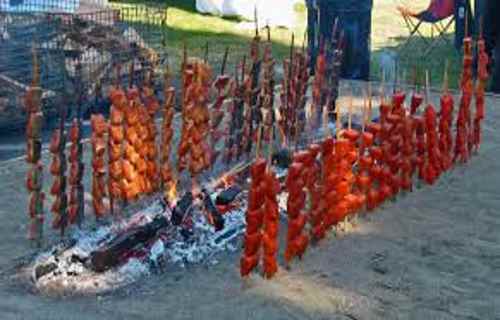
Smoking as a means to make jerky or dried fish was a popular method employed by a variety of tribes, region depending. It was a very simple and effective way to long-term store large amounts of meat.
Method employed by Plains tribes for making jerky, with meat hung on drying racks
Jerky made in this fashion is not entirely like our modern jerky. Traditional jerky tends to be more brittle, almost more like a chip, and it not chewy like store-bought commercial jerky.
Another popular method on the plains was pemmican. This method involved powdered jerky mixed with rendered fats and berries such as bearberry. This type of food is very high calorie, and therefore ideal as a long-term winter food. It is so effective, that it was used extensively on Arctic expeditions as a food source, and is still used today.
Recipes and regional variations would differ, of course, but broadly speaking these two methods are some of the more prevalent methods.
If you include fish into your definition of meat, look to the North-west Coast cultures, where they have numerous ways to preserve large quantities of salmon for long-term storage as well.
I sometimes even think we’re kidding ourselves with our Bug Out Bags and with our three-day food rations. Wouldn’t we be better off looking at what the pioneers took with them when they traveled from Independence, Missouri all the way to Oregon City? Game meat was unreliable even then, so don’t think that they made this five-month journey counting only on that. If your life depended on this, what Bug Out Bag would you take with you? I know I would stick with whatever the pioneer had with him. He had to travel weeks on end without much help while taking cover from some native tribes at the same time.
Buckboard bacon
Buckboard bacon is every bit as easy to make as regular bacon. As we processed the pig, I set aside the ham meat according to its intended use. Once I had enough meat for the buckboard bacon, I cut it into 2-inch-thick slabs, so that it looked somewhat like the pork belly slabs.
Once the meat was weighed, I made the curing mix — ¼ cup canning and pickling (non-iodized) salt, 1 cup of sugar, ½ cup table mustard (not powdered), and 1 teaspoon ground black pepper for every 5 pounds of bacon. I mixed it well, then rubbed it into the meat, making sure it got worked into any crevices.
It might seem odd that the curing mix contained mustard. I know it made me nervous. I like mustard on sandwiches, but did I want mustard-flavored bacon? Definitely not. However, the finished product doesn’t even hint of mustard, so you can use it with confidence.
I made my own curing mix but you don’t have to. I checked out the hunting supplies section of our local farm store and found a variety of packaged cures to choose from. If you can’t find something you like locally, there are countless choices online. I also found many curing mix recipes online.
I layered the slabs in my plastic dish pans and covered them with plastic wrap. I had three pans full, so I stacked them. That forced the meat down, so the curing solution pressed into it.
I’m fortunate enough to have a root cellar that stays between freezing and 40 degrees, so I could park the pans in there to cure for 10 days. If you don’t have a root cellar, a refrigerator works just as well, as long as you keep the containers sealed so they don’t absorb any flavor from other foods in the fridge.
I turned the meat once a day, re-layering so the top pieces rotated to the bottom. I also rotated the order of the stacked dish pans. The cure draws the liquid out of the meat, so it is soon sitting in its own juices. Rotating the stacks makes sure all the meat gets completely soaked in the cure.
On the tenth day, I brought the pans inside. I rinsed the meat, making sure to wash out any crevices. Then I put it back in the dish pans and filled them with cold water to soak.
I soaked it for an hour, then fried a sample piece to test for saltiness. Wow! It tasted like bacon, without the fat and with just a hint of pork chop taste. It was so good, my husband voted to not smoke it. Call me lazy, but I agreed. Why tamper with perfection, I thought. Perhaps we’ll smoke it next time.
I put the slabs in the freezer until they were chilled (but not frozen) and then brought them out for slicing. Chilling the meat, almost to the point of freezing, makes it stiffer and easier to slice. I wanted to slice it thin, like bacon, so that was important.
Since buckboard bacon isn’t from pork bellies, some of the slices weren’t exactly bacon strip shaped. Actually, very few of the pieces came out looking like bacon strips, despite my attempt to cut the meat into slabs. That doesn’t affect the taste, though. I sliced all of it, in various shapes, and then realized I had another challenge. Where was I going to put it all? Our freezer was already bursting at the seams.
I wrapped and stuffed what I could into the nooks and crannies in the freezer. About half of the bacon didn’t fit. Time for Plan B.
Buckboard bacon doesn’t have much fat on it, compared to traditional bacon, so I figured it would dehydrate well. I spread the meat on the dehydrator trays. Ten hours later, I had some delicious “bacon jerky.” Or something like that. It’s great to eat dried, that was for sure. It reconstitutes and fries up for breakfast well too.
The dehydrated bacon keeps without refrigeration. That meant I could send some samples to my sons in California and Florida. Imagine their surprise when I told them I had just shipped them some bacon from our pig — in the mail!
Because the buckboard bacon has very little fat, you have to add a bit of fat to the pan when frying it, whether dehydrated/reconstituted or frozen. Even so, there’s less fat than regular bacon — good news if you’re trying to cut back. It also cooks much faster than bacon so keep a close watch on it while you’re cooking it. Once the bacon is cooked, you can still scramble your eggs in the drippings, for a tasty breakfast.
So far, we’ve eaten the buckboard bacon as jerky, fried like regular bacon, and boiled in a pot of beans. The flavor is great and we’ve never been disappointed. The reconstituted or freshly fried bacon is great for sandwiches — much better than ham, if you ask me!
Just like anyone can get pork bellies and make bacon at home, anyone can make buckboard bacon at home too. However, if you aren’t able to raise your own pig, buckboard bacon may be even easier to make. You can use any cut of pork, so you don’t have to special order pork bellies. Another advantage? I see a lot of grocery store ads for pork roasts — but I never have seen the grocery store have a sale on pork bellies.
The only disadvantage I have found to buckboard bacon? It is disappearing at an alarming rate. If this keeps up, I may have to make all of the ham into buckboard bacon next fall!
Canning roasts or steaks
I home can many jars of different varieties of roast and steak. Now when I say “steak,” this is wonderful meat, tasty and tender. But it is not “steak” as in fresh meat, fried or grilled. This steak I use in recipes like Swiss steak or mushroom steak, where you heat it with a sauce. I will admit that I do get hungry for a fried or grilled piece of fresh meat long before hunting season. And as I have no freezer, by choice, I either have to buy a piece of meat or trade a friend for one.
To can up your roasts, simply cut meat across the grain, then slice them into pieces just a little larger than will go raw into your canning jars. Like the stewing meat, it’s best to brown and partially precook the roast. It seals in the moisture and flavor, and it lets the meat shrink down so that you can fit more into a canning jar.
I use a large frying pan to sear several pieces of roast at a time, carefully turning each one so all sides get evenly browned. Then I lift them out and stack them into a roasting pan. When it contains all the meat I will be processing at one batch, I add water and possibly some powdered beef stock to the frying pan and stir up the brown crusts, left from the frying. This I pour into the roasting pan, with the pieces of precooked meat, adding more water if I think it won’t be enough to cover the meat in the jars. I put the lid on the roaster and cook for just long enough to shrink the meat down a little.
You may use any seasonings you prefer at this point.
When you figure the meat is about half done, lift it out into your clean canning jars and pack them to within an inch of the top. Here again, I cover the meat with broth, to an inch of the top of the jar, taking care to work out any air bubbles. I use a chopstick, but you can use a small spatula or wooden knife, too. From here on, you process the roasts and steaks just like you did the stewing meat.
I wanted to unearth and learn the forgotten ways of our great-grandparents.I went to my grandfather to find out how he survived and to learn the little secrets that helped him stay alive in spite of almost everyone else dying.
Processing ground meat
I probably can more ground meat, both alone and in recipes, than any other form of meat. This is because you have more of it when you butcher an animal, and because it is so versatile. You just use ground meat in so many dishes.
Now you can make hamburger patties, using very low fat hamburger, lightly brown them, then pack them into widemouthed jars and process them with little or no liquid. But when you take them out to use them, the texture is not like that of a hamburger, but more like meatloaf. It is a smoother, more compact texture that some people don’t like in a hamburger bun. It depends on your family’s taste. I do use this method, but when I take the meat out, I arrange it on cookie sheets, put some catsup or barbecue sauce on it, diced onions and slices of green pepper and bake it. You now have little “personal sized” meatloaves that you can then slip onto a bun.
Most often, I simply lightly fry up the lean ground meat and either season it (as for taco filling), or not, as I want. This is one time I do mark the tops of my jars; I want to know what flavorings are in my burger.
When we home can ground meat, I always either buy the leanest burger I can get, or if it is hunted or home raised, I grind it with very little fat. When we grind venison, I mix a little beef fat with it, both for texture and taste. Some people grind pork with the venison, but I think it tastes better with the beef tallow in it, in limited amounts.
If you can any fatty meat at all, you run the risk of having your lids not seal as the fat can get between the lid and the rim of the jar during processing. This is why I severely trim all meat I am going to can and why I grind very little fat with my ground meat. Besides, less fat is healthier for your heart.
With any of your ground beef, you may season it beforehand, as you cook it down, or you may leave it unseasoned and season it when you use it. Go light with the seasoning, however, as canning will strengthen the taste of the spices. You can always add more when you go to use it.
Meat on the pantry shelves forms the base for many nutritious, quick meals. Here are ham, chicken, and turkey, plus broth for soups.
Meat on the pantry shelves forms the base for many nutritious, quick meals. Here are ham, chicken, and turkey, plus broth for soups.
You can also can your own meatballs, with or without sauce. These are very good and extra handy. Simply make your favorite meatball recipe and roll your balls into a golf ball size or smaller. Lightly brown them in very little oil. While they are cooking, gently turn each one so they brown evenly on all sides. Then, carefully pack them into widemouth jars.
Pack the meatballs hot into hot jars, to within an inch of the top. Ladle broth or a tomato sauce over the meatballs. I’ve also had good luck using cream of mushroom soup, diluted with broth or water. Do not use thick, flour-thickened gravy, because it may cause the meat to not heat sufficiently for safe processing.
Remove all air bubbles possible and process at 10 pounds pressure (see altitude chart) for 75 minutes for pints and 90 minutes for quarts.
As with all meat, I’ve found it is best to cover the meat with broth made from the brownings and water. It makes it heat equally during processing and keeps the meat moist and tender. You may use this, or add tomato sauce (seasoned as you wish), and a bit of water, heated to boiling, to cover your ground meat in the jars. Just remember to put hot meat into the jars, and quickly cover it to within an inch of the top of the jar with your hot broth/sauce.
Raw packing steaks and chops
Small steaks and chops, such as pork chops, lamb chops, and veal chops can be raw packed if you wish. They may have small bones left in, which adds to the flavor of the meat during processing. I do not do this with venison, as it is the fat and the bones that often give venison a “gamey” taste. Remove all venison fat and bones before canning steaks or chops.
Cut the meat into one inch slices, removing any large bones. Pack into hot, widemouth jars to within an inch of the top of the jar. You may add ½ tsp. salt to pints and 1 tsp. to quarts for flavor, if you wish. Immediately fill jar to within an inch of the top with hot broth. You may use powdered beef or pork stock or else boil a batch of bones, skim off the fat, remove the bones, and use this broth in your canning.
Remove air bubbles and process jars at 10 pounds pressure (see altitude requirement chart) for 75 minutes for pints and 90 minutes for quarts.
Canning pork sausage
When you are going to homecan your own ground pork sausage, make your favorite recipe as you grind the pork, but omit the sage as it sometimes tastes awful when canned. When you go to reheat it for use, simply sprinkle a little sage onto the patties while simmering with a lid on and they will quickly absorb the sage flavor.
To can pork sausage patties, simply make your patties just a little larger than your widemouth jars and lightly brown them in little oil. Pack hot sausage into hot jars, leaving an inch of headroom. Pour hot broth over the sausages, again leaving an inch of headroom. Remove any air bubbles. Process the same as all above meat.
Pepperoni and salami
Believe it or not, you can easily can pepperoni or salami, or most any other dry sausage. To can whole dry sausages, like pepperoni, simply cut a chunk that will fill your jar to within an inch of the top of the jar, place a hot, previously simmered lid on it and process it for 75 minutes for pints, at 10 pounds pressure. If you live at an altitude above 1,000 feet, see the altitude chart for adjusting the pressure, if necessary. So simple!
Sliced dry sausages, such as pepperoni, is just as easy. Just pack your sliced meat into pint or half-pint jars, to an inch from the top of the jar, cap and process, the same as with whole sausage. No sweat! I just canned 38 half-pints of sliced pepperoni that I got for a great deal; it was nearly to its freshness date. Now it’s good forever, despite power outages, ice storms, floods, or hurricanes.
With these sausages, fat will be cooked out of them, ending up in the bottom of the jar. Leave the fat behind when you use the sausages—the taste is the same, but there will be much less grease to clog your arteries.
Small game
Rabbits or any small game animals can be easily home canned. If there is quite a bit of damage from gunshot, soak for an hour in a salt brine, made with a gallon of water and 4 Tbsp. salt stirred up in it. Soak, then rinse and pat dry.
I prefer to hot pack my small meats as you get more meat into a jar and there is less wasted space. When you raw pack meat it shrinks during the processing, and you end up with a lot of extra space in each jar.
I usually boil or bake the whole rabbit, squirrels, or whatever until it is nearly done. Then I remove the meat from the bones and pack it into jars. You can also disjoint the meat and pack it with the bones in. Pack the meat into hot jars, leaving an inch of headroom. Pour hot water or hot broth over the meat, also leaving an inch of headroom. Remove all bubbles. Add a ½ tsp. salt to pints and 1 tsp. to quarts, if desired.
For bone-in meat, process at 10 pounds pressure (see altitude chart) for 65 minutes for pints and 75 minutes for quarts. For deboned meat, process at 10 pounds pressure (see altitude chart) for 75 minutes for pints and 90 minutes for quarts. The reason for this difference is that with small animals, the meat is thinner and with bone-in meat, there is more room for the hot broth to penetrate quickly, heating the meat faster than if you are canning boned meat, which is packed in tighter.
I’ve found that my kids were much happier eating the rabbits they raised and wild game they hunted a few months after it was killed. The sentiment had worn off by then, and I didn’t make an issue of what was for dinner. We just ate it and were thankful.
Home canning poultry
While I have raw packed poultry, I have found that it is much nicer and more efficient to hot pack it. Here you precook the meat and pack it hot into hot jars. When I raw packed my chickens that we were butchering in a hurry, the canning went fast. But when it was finished, there was a whole lot of jar and not so much meat left down in the bottom of it, and the end product did not look appetizing as it does with hot packed poultry. Another drawback is that the raw packed poultry tended to be a little chewy after processing and storage, as it kind of dried out. So today I do nearly all my poultry using the hot pack method.
You may use these directions for any poultry, fowl, or game birds.
Boil or bake the birds until nearly done, so the meat will pull easily off the bones. I prefer to remove the bones and boil them up for broth to cover the meat. In this way, no space in the jar is taken up by bones.
Author readies finished ½ pints of pepperoni for the pantry. Rings are removed for storage to prevent rusting.
Author readies finished ½ pints of pepperoni for the pantry. Rings are removed for storage to prevent rusting.
I pack my poultry into both pint and half-pint jars. The widemouth pints contain whole or large pieces of breast. If you have a large family, you may want to use widemouth quarts for the same choice pieces of meat. Regular jars can hold the large pieces of meat from the legs and thighs. Or you can dice all the leftover meat into them. This is handy to use for a huge assortment of recipes. In the store, less than a half-pint of diced chicken breast is over $2.00.
I usually remove the breasts and can those in large pieces or whole, depending on the size of the birds. The rest of the bird I dice up, as I use a whole lot of diced poultry meat in mixed recipes from chicken enchiladas to chicken noodle soup.
Like I said, I boil or steam the bird, debone it, and pack it into hot jars. Then I ladle the grease off the broth and pour the broth over the meat, to within an inch of the top of the jars. Remove air bubbles. This boned meat is processed at 10 pounds pressure (see altitude chart) for 75 minutes for pints and 90 minutes for quarts. Bone-in poultry meat is processed for less time due to the spacing the bones create, allowing the meat to heat quicker and more thoroughly. This is processed at 10 pounds pressure (see altitude chart) for 65 minutes for pints and 75 minutes for quarts.
One reason I like to bone my poultry is that it leaves me with this big pile of bones and a lot of extra broth for making a soup base. I put the bones back in the broth. With a baked turkey, I add water to the roasting pan, mix in the brownings and pour the works in a large stock pot with the turkey carcass or bones. I simmer all the bones for about half an hour, then let it cool down so I can handle the bones. I carefully remove any clinging meat on the bones and put it into a bowl. I put the bones into another bowl and “yucky” scraps into another for the huskies’ treats. Never feed cooked small bones, such as poultry or pork bones to dogs. It can kill them by puncturing their intestines. I skim most of the fat off the cooled broth and add that to the huskies’ dry food. Then I take the little bit of shredded meat I have and put it into several pint or quart jars. I heat up the broth again to boiling, adding some powdered chicken soup base or seasonings, as I like. While that’s heating, I often add a small handful of grated carrots, perhaps a few peas, parsley or whatever I want, a handful of rice or dry noodles, then add the broth to within an inch of the top of the jar. Process at 10 pounds pressure (see altitude chart) for 75 minutes (pints) or 90 minutes (quarts). I usually use regular mouth quart jars, since I usually use a quart of this ready-made soup base at a time.
A few last hints
Use a broth on your meat, not a heavy gravy. Thick, flour thickened gravies canned with your meat could prevent the meat from quickly heating thoroughly while processing.
Always wipe the rim of your jars after filling, with a warm, damp, clean cloth. Grease on a jar rim is your enemy; it can prevent the jars from sealing.
If a jar does not seal, reprocess it with a new, previously simmered lid right away, or refrigerate until you can. (Reheat it before you again put it into your canner.) If it’s a single jar and you’re through canning, simply use it soon in a home-cooked meal.
Always check a jar before you re-heat it to use. Make sure the seal is still firmly indented in the center and that you have to really pry to remove the lid. If it comes off easily it’s not sealed. Now look at the contents. Do they look appetizing and normal? Does the meat smell great? Before tasting the meat, heat it to boiling temperature for 10-15 minutes (longer for altitudes above 1,000 feet) before tasting or serving. You do not have to boil the meat, but make sure you heat it to boiling temperature which ever way you prepare it, be it in a casserole, a stew, roasted in the oven, etc. By doing this every time you use a jar of your home canned meat, you will ensure that you and your family are safe from food poisoning.
Always read your canning manual before attempting to can anything. It’s only common sense.
I hope you are off on the road to a whole new way of food storage. While many people home can pickles, jams, and jellies, not so many attempt meats. And because they’re so good and easy to can, they’re missing a whole lot. So, try putting up some meat. You’ll soon discover how truly indispensable they are! Good canning!
Anyone for canned eggs?
Ever heard of an old-time was of preserving eggs called waterglassing? It’s a method that won’t win many conterts today, but for someone who needs to reduce their dependency on refrigeration, it might be worth a try.
Hens naturally lay more eggs in the spring. There are ways to even out the cydle, but people who keep hens will still have spells of heavy or light production.
Where refrigeration was either unavailable or too expensive, old-timers often kept their eggs and milk fresh longer by loading them into a bucket and lowering them into a deep well. (They also developed egg-free recipes for those times when they simply had to do without.)
Waterglassing was also fairly common, and I always wondered how it was done. When I finally found directions for the process, I realized why it had fallen so thouroughly out of favor. Beyond storing the eggs in a cool dry place, waterglassing calls for them to be immersed in a slimy, unappetizing liquid.
Waterglass is a sodium silicate solution, obtained from a druggist. One pint of waterglass is mixed with 9 to 10 pints of boiled, cooled water. The solution is then poured into a scalded storage crock (ora 5-gallon bucket), and the eggs are immersed in it. The slimy solution seals the pourous eggshell against air and moisture and thus retards spoilage.
Keep the fluid in the crock at least 2 inches above the eggs to allow for evaporation. Add more boiled, cooled water to maintain that level. Keep the crock tightly sealed and in a cool place. The solution isn’t poisonous, but you have to be careful to rinse the eggs well before you use them.
RELATED : Herbal Medicine: How Knowing Medicinal Plants Can Save Your Life in an Emergency
Food security
Using substitutes such as corn syrup and vegetable shortening, home economist Ida Lansden shows a group of Alexandria, Virginia, women how to bake the most succulent of sugarless, butterless cakes.
Food security means different things to different people. Some think of it as having enough to eat. Some feel it’s knowing their food is of a certain level of quality. Some think of it as always being able to acquire food when they need it.
For me, it’s knowing that we are prepared for many different situations — loss of work, loss of electricity, zombie apocalypse, whatever. It means making sure that every penny of our food budget goes as far as it can — that I honor the hard work my husband, Rudi, does to provide for our family by protecting the resources we have and using them to their fullest. This gives me peace of mind and self-confidence that helps me not panic when things get scary.
With that in mind, here are a few more tips that work for me:
Don’t put all your eggs in one basket (or your squash, or your plums, or your beef stew). Having half an acre of veggies processed and in the freezer will not do you much good if the power goes out and all your food goes bad. Nor would your food security be enhanced by discovering that you had a canning failure on 20 pounds of beef.
This is why I recommend that you take the time to buy or preserve your foods in a variety of states, if possible. Freeze some uncooked, some prepared. Can some, dehydrate some. Store some as full meals and some as separate ingredients. Yes, it’s more work, but it also grants peace of mind, not to mention the convenience of having a wider array of options available when planning and preparing meals.
Meat is a specialty item. I don’t dehydrate meats for food storage because they don’t last as long as meats that are properly canned or frozen. It’s the fat that even very lean meat has to make it go rancid over time. At most, good home dehydrated jerky will last a few weeks without freezing. However, it does make a tasty, nutritious, lightweight food to carry for camping or a road trip, so I try to plan ahead and have some on hand for short-term needs.
It doesn’t have to be all or nothing. The main reason people choose to put up big lots of a given food at one time is that it’s more efficient. After all, if you’re chopping vegetables and filling jars, chopping and filling a little more only takes a little more time because you’re already set up for it. But small-batch preserving might be right up your alley, not to mention that having a few jars of this and that is a great way to start building up a good pantry.
It doesn’t have to be all at once. Maybe the idea of big-scale preserving does appeal to you. Don’t go overboard and burn out! Choose one thing, do that, repeat. You’ll get into a groove and before you know it, you’ll be looking for more places to stash your treasure.
The main thing is that you can take steps to make your family’s menus inviting, delicious, and healthy. You can save money doing it. And you can find great satisfaction in it. I do, and you will too. Just start and you might be amazed at what you achieve.
Every home canner will occasionally have jars that spoil on the shelf. The need for safety here can’t be overemphasized. The organisms that spoil canned food are uniformly poisonous to humans, especially in the quantity present in a bad jar of canned food.
The most potent spoilage organism in low-acid foods is botulism, which produces a powerful neurotoxin that will shut down your nervous system. Low-acid foods that have spoiled should be disposed of with the utmost caution because he botulism toxin can be absorbed through the skin. I’m going to detail the most cautious handling methods I know.
First, when you find a spoiled jar, put it down immediately and wash your hands. Prepare a sanitizing solution of ¾ tsp. bleach to 1 cup of water, preferably in a spray bottle. Sanitize your hands with this solution and then put on rubber gloves.
A second possible reason is that, prior to World War II, people were less likely to amass canned food reserves in excess of a year’s needs. The more primitive, labor-intensive gardening methods, as well as the lack of well-paid, year-round employment, meant that most people did not have their home-canned food last them all the way until the next harvest.
A third, less pleasant reason is that because botulism is odorless, colorless, and tasteless, many people probably succumbed to it without anyone knowing what had made them sick. Today we often take for granted the technology that can pinpoint the cause of an illness. Even a generation ago, food poisoning often went undiagnosed, or was mistaken for something else.
Canning is a fine home craft. Keeping a balanced assortment of home-preserved foods in your pantry gives you a wonderful sense of security and accomplishment. Best wishes to everyone who gives it a try.
RELATED : Tips For Preppers: Supplies, Survival Food And Emergency Essentials
Table of Equivalent Measurements
1 teaspoon = 1/3 tablespoon
3 teaspoons = 1 tablespoon
½ tablespoon = 1½ teaspoons
1 tablespoon = 3 teaspoons
2 tablespoons = 1/8 cup
3 tablespoons = 1½ liquid ounces
4 tablespoons = ¼ cup
8 tablespoons = ½ cup
16 tablespoons = 1 cup
1/8 cup = 2 tablespoons
¼ cup = 4 tablespoons
1/3 cup = 5 tablespoons plus 1 teaspoon
½ cup = 8 tablespoons
2/3 cup = 10 tablespoons plus 2 teaspoons
¾ cup = 12 tablespoons
1 cup = 16 tablespoons
1 pint = 2 cups
1 quart = 4 cups
1 gallon = 4 quarts, 8 pints,
16 cups, 128 fluid ounces
Other useful resources:
The Lost Ways (Learn the long forgotten secrets that helped our forefathers survive famines,wars,economic crisis and anything else life threw at them)
Survive Attack to Our Power Grid System (Weapon That Can Instantly End Modern Life in America)
Survival MD (Best Post Collapse First Aid Survival Guide Ever)
Backyard Innovator (A Self Sustaining Source Of Fresh Meat,Vegetables And Clean Drinking Water)
Blackout USA (EMP survival and preparedness)
Conquering the coming collapse (Financial advice and preparedness )
Liberty Generator (Build and make your own energy source)
Backyard Liberty (Easy and cheap DIY Aquaponic system to grow your organic and living food bank)
Bullet Proof Home (A Prepper’s Guide in Safeguarding a Home )
Family Self Defense (Best Self Defense Strategies For You And Your Family)
Survive Any Crisis (Best Items To Hoard For A Long Term Crisis)
Survive The End Days (Biggest Cover Up Of Our President)
Drought USA (Discover The Amazing Device That Turns Air Into Water)
SOURCE : backwoodshome.com