
Many people who are interested in green living are turning to Native American gardening techniques to learn how foods were grown in the past. Native Americans had to survive on what they grew, as well as what was available in the wild, for their survival. Some of the techniques that they used in the past are still used successfully today.
No chemical Growing
Organic growing is something we can find out a lot about now. Many people across the world, in a variety of environments, grow vegetables organically, with no chemical fertilizers. And of course, our forebears did this too. It is a case of working with what you have. For example, human urine, which is sterile, is a well known fertilizer of vegetable plants as it is full of nitrogen and potassium. Giving your plants a personal watering does them a lot of good. On the subject of urine, compost toilets are an excellent idea and building one should be top of your agenda of things you need to know how to do. A compost toilet basically, composts your own waste products, which takes around 6 months. Once composted the resultant mulch can be used for plant food and as a way of controlling water loss from the soil.
Gardening the Native American Way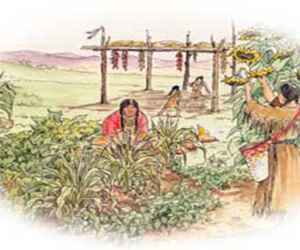
Native Americans used many of the techniques that we use today in our gardens. For example, corn or maize was grown in rows because it made pollination easier. Beans that couldn’t grow without a trellis were trained on poles or cornstalks. Gardens were often fertilized with fish from nearby creeks or rivers and today we use bone or fish meal for the same reason.
Three Sisters
One of the most often used Native American gardening techniques was the Three Sisters. This method used three different seeds planted together in one large mound of dirt. The seeds were corn, squash and beans. Each of these seeds would provide something that the other seeds would need as they grew. The beans would provide nitrogen to the soil, which the corn and squash would need to grow strong. The corn provided a trellis on which the beans would grow. The squash provided cover for the other two plants as they were growing and helped to deter some pests. Some Native Americans would also put a fish or eel in the hole first, and then place the seeds on top before covering with soil. This provided added fertilizer to the soil.
It is interesting to note that the growing of the Three Sisters varies in the east and west. In the west, the bean varieties cultivated were often self-supporting, so they did not have to be planted in the same hole as the corn and squash.
Four Sisters
Some of the southwest tribes also planted a “fourth sister” in addition to corn, beans and squash. They also planted the Rocky Mountain bee plant, which helped to attract bees to pollinate their gardens.
Jerusalem Artichoke
The Jerusalem artichoke, also known as the sunchoke, is a perennial sunflower that has edible tubers. Native Americans ate them mashed like potatoes. It was also used as a thickening agent in soups and stews. They were grown along dried river bottoms and in fertile loam soils so that the tubers were easy to dig up once mature. They were grown, and still are today, in the northern third of the United States.
Wild Rice
Wild rice was an important part of the American Indian diet. It was grown in Wisconsin, Minnesota and parts of the Great Lakes. Wild rice needs three to eight feet of water to live in. It depends on consistency in the weather and water levels in order to survive.
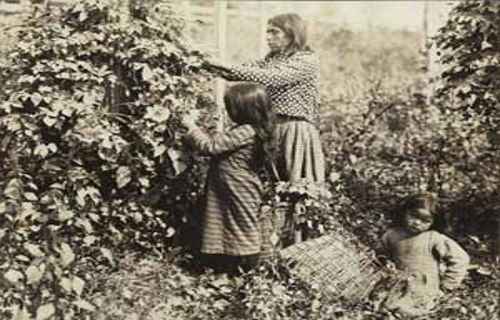
Women would go into the water several weeks before the rice was ready to be harvested. They would tie the rice into small sheaves, which kept the rice kernels from falling into the water when they ripened. Today, as in the past, the rice is collected in canoes. While several people paddle a canoe, one person sits at the stern and uses long wooden poles to knock the rice grains into the canoe and then the plants are allowed to spring back into place. Some grains are always left behind on the plants so that they re-seed for the following year.
Grown Herb 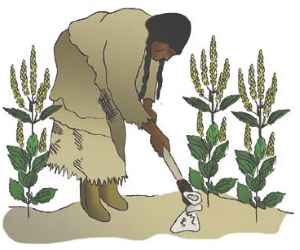
Most local garden centers sell commonly grown herb seeds and transplants ready to grow in the garden. If selecting herb seeds, you can start the seeds in a seed-starting container and transfer to the garden once propagated, or you can plant the seeds directly into the garden and thin the seedlings once they sprout. The plant tags or seed package gives all the necessary information on mature plant size and any growing requirements. Some commonly found and grown herbs include:
Sweet basil: Sweet basil (Ocimum basilicum) is an aromatic and a hardy annual herb used in many culinary dishes. It makes an attractive addition to containers or grown directly in the garden and can grow over a foot tall at maturity. Use the leaves fresh or dried.
Coriander/Cilantro: Coriander and cilantro (Coriandrum sativum) both come from the same aromatic annual plant. The leaves are cilantro and the seeds are coriander. For the best taste, use the leaves while young. Flowering occurs during summer and then the production of seeds happens.
Cumin: Cumin (Cuminum cyminum) is a small-growing annual herb belonging in the parsley family and needs a long period of warm weather to produce the flowers and seeds used in culinary dishes. Once the seedpods turn brown, they are ready for harvesting and using.
Dill: Dill (Anethum graveolens) has various uses in flavoring culinary dishes like dill pickles. The annual resembles fennel in its growth habit and description. Use the tops, foliage and stems fresh or dried. Dill doesn’t always transplant well, so starting seeds directly the garden and thinning to 12-inches is best.
Lemon balm: Belonging in the mint family, lemon balm (Melissa officinalis) performs as a hardy perennial growing up to 2-feet tall and wide. Its lemony-scented foliage and young stems add flavor to beverages and foods. Use the foliage fresh or dried.
Mint: There are several commonly grown mints (Mentha spp.), that are robust perennial growers in the garden. Peppermint (Mentha piperita) and spearmint (Mentha spicata) are two low-growing types you are most likely to find in garden centers. Plants produce runners and can quickly become invasive, so to keep the plants under control, you might want to plant them in containers. The small leaves and flowers used dried or fresh, flavor beverages and foods.
Oregano: Another relative of mint, oregano (Origanum vulgare) is a hardy perennial. It works well used in containers or grown directly in the ground. The foliage is aromatic and used fresh or dried to flavor foods.
Rosemary: Rosemary (Rosmarinus officinalis) grows as a tender perennial shrub that can reach up to 6-feet tall and wide at maturity. It belongs in the mint family and makes an aromatic addition to herb gardens and is drought-tolerant once established. Its flowers, stems, and leaves have various culinary uses both fresh and dried.
Sage: Belonging in the mint family, sage (Salvia officinalis) grows as a perennial, but many gardeners grow it as an annual herb. Its grayish foliage is an eye-catching and aromatic addition grown among green-foliaged herbs. It usually produces purplish flowers in summer during the second year of growth. Use the leaves fresh or dried in various culinary dishes.
Thyme: Thyme (Thymus vulgaris) is a perennial herb often grown as an annual. This member of the mint family has a shrubby habit, producing smallish, greenish-gray foliage and purple flowers, both of which are useable dry or fresh. The herb is well-suited for potted growth and tolerates drought once established.
SEED SAVING
At one time, seed saving was a necessity. Gardeners and farmers carefully selected and stored the best seeds from their harvests, ensuring they had seed for planting in subsequent years. The knowledge of pollination, purity, harvesting and storage of seeds was all part of survival and learned within the family and community.
The rise of commercially available seed resulted in a trend away from seed saving. Farmers and gardeners simply purchased new seed every year. Growing concern regarding the loss of commercially available seed offerings however, led to a grass-roots movement in the late 70’s and early 80’s dedicated to seed saving.
Today, recognition of the importance of crop genetic diversity is exemplified by the many local, regional and national efforts devoted to conserving the heirloom, traditional varieties that were once so prevalent. For both home gardeners and seed bank operators, the fundamentals are the same in terms of saving seed and maintaining purity. What follows are some basics to get you started saving seeds.
SEED HARVESTING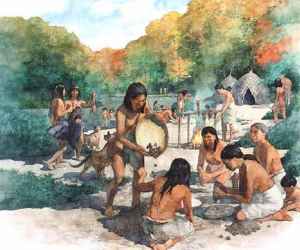
How plants are harvested depends somewhat on whether you’re trying to maintain a variety ‘as is’ or are selecting for certain traits. If you’re trying to maintain a variety ‘as is’, save seed from as many individual plants as possible, even if only 1 seed per plant. If seed matures over a period of time, save seed from multiple harvests so that seeds from early- and late-maturing plants are included in the sample. This helps ensure that genetic diversity will be maintained in your seed sample. On the other hand, if you’re actually selecting for certain traits, only save seed from those plants that express the desired trait.
TIMING OF HARVEST
When to harvest depends slightly on whether the seeds are produced in ‘dry’ or ‘wet’ fruit. Examples of ‘dry’ fruit include chiles, beans, black-eyed peas, gourds, okra, amaranth, sunflowers, corn, peas, garbanzos, cotton, most greens and herbs, sorghum, tobacco, and wheat. These should be harvested when the fruit/seeds are dry. When the seeds rattle in their pods or have begun to fall from the plant, they are typically ready to harvest. They can be left in the field until completely dry or harvested and placed in a protected area to finish drying.
Examples of ‘wet’ fruit include melons, watermelons, squash, tomatillo and tomato. These should be harvested when the fruit are slightly over-ripe but are not rotten. For vining crops, the fruit are typically mature when the fruit are somewhat whitish on the bottom side and the tendrils on the fruit-bearing stem and two adjacent stems are dry. The fruit are typically split and the seeds are scooped out of the fruit, washed and allowed to dry on cloth towels or pillowcases out of the light and heat.
The following are typically mature, and therefore ready to be harvested, when dry:
Amaranth – cut seed head when majority of flowers feel stiff to the touch, continue drying in a paper bag, pillowcase or on a metal tray to collect seeds that drop.
Beans/Black-Eyed Peas/Peas/Favas/Lentils/Tepary Beans – pods should be dry and can be picked by hand or by cutting the plant at ground level, letting dry on a tarp out of the rain and threshed.
Chiles – allow chiles to dry on the plant, hand harvest.
Corn – harvest sweet corn just after the milk-stage in the kernels (milk-stage is when a finger nail pressed into a kernel produces a white, milky liquid); sweet corn left too long on the plant may begin to ferment in the husk; for other corns, the cobs may dry completely on the plant, unless frost is likely or birds become a problem; remove entire cobs from plant.
Gourds – allow to dry on the vine until just before first frost, then continue drying out of the rain; can take several months; gourds are dry when seeds rattle.
Okra – let dry on plant but harvest before fruit opens allowing seed to drop.
Sunflowers – let dry on plant as long as possible, protect from birds by covering seed heads with netting or pillowcases; cut heads and let dry in a cool, dry place or in paper bags.
Melons, watermelons and squash are typically mature and ready to be harvested when the tendrils are dry on the fruit-bearing stem and the two adjacent stems. Some crops require a period of after-ripening in order for the seeds to fully mature. After harvesting, allow squash to after-ripen for 21 days before removing seeds.
SEED CLEANING
Seeds must be cleaned before they can be stored. Different crops require different techniques for cleaning. Overall, seeds should be free of plant material (bits of leaf, stems, etc.) and bad seeds (non-viable, broken, split, etc.).
Download printable instructions for cleaning dry processed seeds here.
Some common techniques for cleaning seed include:
Threshing – break up plant material (including fruits or pods) and expose the seeds by stomping, beating, crushing, etc.
Winnowing – separate plant material from seed with a gentle fan or light wind, leaving only clean seed.Tarp/fan – slowly pour threshed seeds in front of a fan placed near a tarp, heavy seeds fall onto tarp while the light-weight plant debris is blown farther away.Hand-cleaning – remove plant debris by hand.Blending – some wet processed seeds can be cleaned by blending fruit in a blender; add water and ‘float’ debris off the top as water is poured off slowly; repeat filling and pouring water off until only clean seeds remain (bad seed and plant debris floats to the top and is poured off with water; good seed sinks). This works well for tomatillos, tomotoes, chiltepines, and small chiles.
STORING SEEDS
Seeds can last for quite a long time when properly stored. Under frozen conditions, such as in any household freezer, many seeds will last 10 or more years, easily. While seed longevity under any storage condition is primarily dependent on the quality of the seed going in, there are certain conditions that lend themselves to longer seed storage time frames:
Storage containers should not allow moisture to enter, nor to build up inside.
Use glass jars with lids, metal trash cans, envelopes or bags, plastic ziploc bags.
Store seed in a dark, cool, dry place such as a root cellar; paper bags in a closet; do NOT store in outside sheds.
Optimal seed storage conditions – 45-55 degrees with ~25% humidity
The International Seed Saving Institute offers online instructions for saving a variety of seeds. They classify techniques into three categories: 1. beginner (bean, lettuce, pea, pepper, tomato), 2. experienced (corn, cucumber, muskmelon, radish, spinach, squash, pumpkin), and 3. expert (beet, swiss chard, cabbage family, carrot, escarole, frisee, onion, radicchio, turnip, Chinese cabbage). The lessons include selection traits, harvesting and processing.
Remember… back in those days, there was no electricity… no refrigerators… no law enforcement… and certainly no grocery store or supermarkets… Some of these exceptional skills are hundreds of years of old and they were learned the hard way by the early pioneers.
Today is your chance to be part of saving The lost super food . I wanted to make this information available to every family out there without having to spend years of their lives or thousands of dollars.
So I came up with this great idea to edit all my manuscripts and to turn all this lost knowledge into one of the greatest books of this century:
The lost super food
Saving Our Forefathers’ Skills
Here are some of my favorite canning recipes. I guess they are my favorites because I grow many of these items myself in my garden and orchard. You can also find literally hundreds of canning recipes, and more information on canning techniques in The lost super food
Books can be your best pre-collapse investment.
Carnivore’s Bible (is a wellknown meat processor providing custom meat processing services locally andacross the state of Montana and more. Whether your needs are for domestic meator wild game meat processing)
The Lost Book of Remedies PDF ( contains a series of medicinal andherbal recipes to make home made remedies from medicinal plants and herbs.Chromic diseases and maladies can be overcome by taking the remediesoutlined in this book. The writer claims that his grandfather was taughtherbalism and healing whilst in active service during world war twoand that he has treated many soldiers with his home made cures. )
Easy Cellar(Info about building and managing your root cellar, plus printable plans. The book on building and using root cellars – The Complete Root Cellar Book.)
The Lost Ways (Learn the long forgotten secrets that helped our forefathers survive famines,wars,economic crisis and anything else life threw at them)
LOST WAYS 2 ( Wordof the day: Prepare! And do it the old fashion way, like our fore-fathers did it and succeed longbefore us,because what lies ahead of us will require all the help we can get. Watch this video and learn the 3 skills that ensured our ancestors survival in hard times offamine and war.)