

How to Make Probiotic Ginger Beer – a naturally fermented probiotic drink that is packed with health benefits.
This article includes a photo tutorial, information on secondary fermentation, flavoring your ginger beer, and troubleshooting when the process goes awry.

Disclaimer: brewing probiotic beverages at home can be risky. When fermenting probiotc foods and beverages, use caution. Always use sanitized tools and when in doubt, throw it out! If you notice any strange smells or mold, be sure to discard the whole batch.
Many moons ago, I wrote a cookbook called Self Sufficient Backyard. This cookbook is focused entirely on making probiotic-rich beverages such as kombucha, kefir, ginger beer, fermented vegetable juice, and more, at home.
My favorite of all the fermented beverages to make is ginger beer. First and foremost, it is magnificent tasting.
Secondly, it is CHALLENGING.
Perhaps the most challenging and unforgiving of all the fermented drinks.
And for that reason, the most rewarding.
For those of you who have been around this site for a long time, you may remember my easy tutorial on How to Make Ginger Beer.
This is the goof-proof method that works each and every time and does not require much time or attention.
This version of probiotic ginger beer is different. It involves preparing a “ginger bug” (or ginger starter) from scratch.
How does that work?
Probiotics and yeast are naturally occurring everywhere. They are in our fruit and vegetables and are also present in the air. Giving these probiotics and yeast optimal conditions to grow and reproduce results in fermentation.
You’re already familiar with this concept, as it is the same process for creating yogurt, cheese, beer, wine, pickles, prosciutto (and other fermented meats), etc.
Applying this idea to fresh ginger is how we create a ginger starter, which is then used to make ginger beer.
Don’t worry…I’ll go over how to make a ginger starter in excruciating detail later on in this post. First, let’s cover some basics.
WHAT IS GINGER BEER?
Ginger beer is a naturally fizzy beverage with a sweet and spicy bite. Grated ginger is fermented in sugar water and lemon juice, allowing the natural yeasts in ginger to feed and multiply, creating a probiotic beverage.
While ginger beer is a sweet, spicy, delicious beverage all on its own, it is famous for its role in cocktails, particularly the Dark & Stormy cocktail, a mixture of ginger beer and rum, garnished with a slice of lime.
WHAT IS THE DIFFERENCE BETWEEN GINGER BEER AND GINGER ALE?
The phrases, “ginger beer” and “ginger ale” are typically used interchangeably, but there is a difference between the two beverages. Ginger beer is fermented for up to 2 or 3 weeks using a “ginger bug,” where ginger ale is more of a ginger flavored soda.
While there are ginger ale beverages made with real ginger, most ginger ales are simply carbonated water with ginger flavor and sugar. In this sense, ginger ale does not go through the same fermentation process that ginger beer does.
METHODS FOR MAKING GINGER BEER
There are multiple ways to make ginger beer. Here are three of the most common methods:
- Non-probiotic ginger soda/ale: For those who aren’t concerned about the probiotic benefit of fermented ginger beer, you can simply combine ginger simple syrup (made with ginger and sugar) with soda water and achieve a great-tasting homemade beverage. This version contains no probiotics and is basically fancy soda.
- Quick and Easy Ginger Beer with some probiotic benefits: This fast method uses bread yeast for fermentation and requires only two days to complete. For this version, read my blog post on How to Make Ginger Beer. This version is not as probiotic rich, but is still lower in sugar than regular soda.
- Authentic Probiotic Ginger Beer – a health elixir: The authentic method for making fermented ginger beer is outlined in this post. It uses a probiotic-rich “ginger bug” (or ginger starter) which you make yourself at home. Like most things in life, the authentic version takes much longer than the easy version, but also yields great results. This version can take between 2 and 3 weeks to complete.
HEALTH BENEFITS OF GINGER BEER
Fermented ginger beer has a great deal of health benefits and is commonly used to ease upset stomach, nausea or diarrhea.
Ginger is an anti-inflammatory, which can help with migraines, and studies show fresh ginger prevents and fights several types of cancer cells including breast, colon, ovarian, prostate, and lung cancer.
Ginger is also known for cleansing the body of toxic chemicals, easing menstrual cramps, and much more!
The probiotics and yeast that grow during the fermentation process help colonize your gut with good bacteria, which helps boost immunity, fight disease, and promotes overall health.

HOW TO MAKE FERMENTED PROBIOTIC GINGER BEER
Fermented probiotic ginger beer requires a three-step process.
Step 1: Make a “ginger bug” or starter using fresh ginger, water, sugar and lemon juice. This starter is used to brew a batch of ginger beer (Step 2). This can take 1 to 2 weeks to complete (depending on the temperature of your home and how active your culture decides to be).
Step 2: Brew a large batch of ginger beer using the “ginger bug” – you could compare this process to making a batch of sourdough bread dough using sourdough starter. This process takes about 1 to 3 weeks, depending on how active your ginger bug is and how warm your home is.
Step 3: Bottle the ginger beer and allow it to ferment further – Once the beverage becomes effervescent (fizzy/probiotic-rich) we bottle it and allow it to sit for “secondary fermentation” (more on this below). This process takes about 2 to 5 days.
You Will Need:
- 1-quart glass jar or jug
- Cheesecloth
- Stretchy rubber band
- 1-gallon glass jug
- Flip-Cap Bottles
- Fresh ginger
- Organic Cane Sugar
- 2 to 4 Lemons
Ingredients for the “Ginger Bug:”
- 1-inch nub fresh ginger, peeled and grated, plus more for feeding the starter
- 1 tablespoon raw organic sugar, plus more for growing the starter
- 2 cups water
Instructions for the Ginger Bug / Ginger Starter:
Peel and grate a 1-inch nub of fresh ginger (about 1 tablespoon).
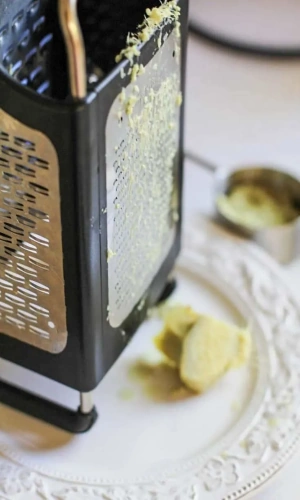
Add the grated ginger, 1 tablespoon of sugar, and two cups of filtered water or spring water (non-chlorinated) to the jar and stir (a 1-quart jar works great).
Cover the jar with a cheesecloth or towel. Secure the cloth around the jar with a rubber band. This keeps insects away from the starter.
Allow jar to sit in a warm, dark place for 24 hours. The optimal temperature for preparing the ginger starter and brewing ginger beer is between 70 and 85 degrees.
If your house stays cool, find the warmest spot in your home to place the ginger starter. This process activates the probiotics and yeast that are in the ginger and allows them to begin reproducing.

Feed the colony – Once a day for one week, add one teaspoon of sugar and one teaspoon of grated fresh ginger to the jar and stir well.
This ensures your ginger starter stays fed and grows, similar to sourdough starter. Stir a couple of times per day.
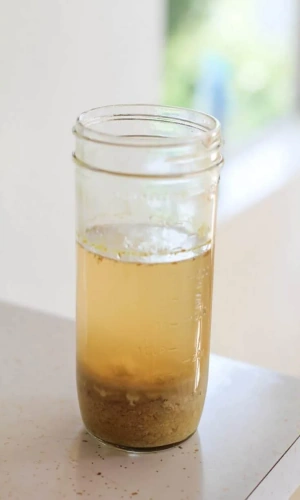
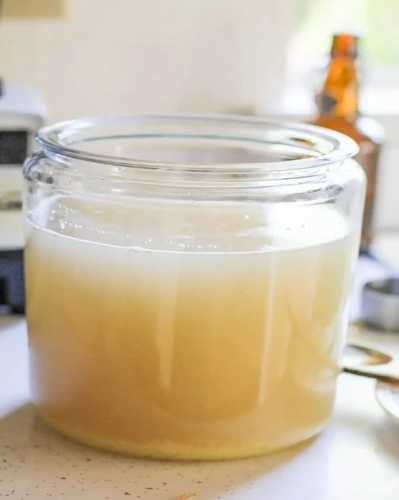
During this process, natural yeasts are released and create a white substance at the bottom of the jar. This is where the probiotics come from.
After about 3 to 5 days (perhaps longer if your house is very cold), the liquid will begin bubbling when you stir it. Once you can see and hear bubbles without touching the jar, your ginger bug is ready to be used. This will usually take 7 to 10 days in a warm (70 to 80 degrees F) house, but longer in a cool house.
To expedite the process, wrap the ginger starter jar in a heat blanket or an insulated blanket to keep it warm. If after 7 days, your ginger bug is still not bubbling, continue adding a teaspoon of sugar and ginger until it does. Have patience, friend!
In some cases, folks have gotten bubbles within only a few days of beginning their starter. While this is unusual, it is a sign the starter is ready! As soon as you see the bubbles rushing from the bottom to the top, you’re ready to go.
Use the liquid from ginger starter to make ginger beer (instructions below).
You can continue adding water, ginger, and sugar to the starter and to use it for multiple batches of ginger beer. In this sense, you can treat your ginger starter the same way one would treat sourdough starter and keep it alive.
Note: If you ever see mold floating on top of the starter liquid, discard the starter and make a new one.
Ingredients for the Ginger Beer:
- 1 cup ginger starter (see above)
- 1 scant gallon of filtered spring or well water
- 1 1/4 cups organic cane sugar
- 1/2 cup fresh lemon juice
- 1/3 cup fresh ginger, grated
Instructions for 1 Gallon of Probiotic Ginger Beer:
Fill a gallon-sized jug most of the way up with spring or well water (do not use water from the tap unless your house runs on a well). This water should be room temperature or slightly warmer (aim for 70 to 80 degrees).
Add one cup the the ginger starter, along with 1 1/4 cups of sugar, 1/2 cup of lemon juice, and 1/3 cup of grated ginger. Stir very well.
Cover the jug with a cheesecloth or towel bound by a rubber band and put it in a warm, dark place at room temperature for 8 to 10 days. Mine takes 8 days, even in a very warm (80⁰F +) house.
Taste-test the mixture periodically to see if more sugar needs to be added (the natural probiotics will eat the sugar so if the beverage ever loses all of its sweetness, add a little more sugar (no more than 2 tablespoons at a time), but be careful to not overload the probiotics, as they can die when given too much sugar.
Stir the mixture once or twice a day. You will notice a white substance forming around the ginger at the bottom of the jug.
This is the natural yeasts coming out of the ginger – it’s a good sign! There will also be large bubbles that form on the surface of the liquid.
The ginger beer is ready when the substance becomes bubbly when stirred (similar to when you’re making the ginger starter).
Once the ginger beer is ready, give it a taste test. If it doesn’t taste sweet, add additional sugar and ginger because once you bottle the brew, it goes through secondary fermentation and the probiotics continue to need to eat sugar.
At this point, your options are to either bottle the ginger beer as-is or flavor it prior to bottling it. See information on Secondary Fermentation and flavoring options below.
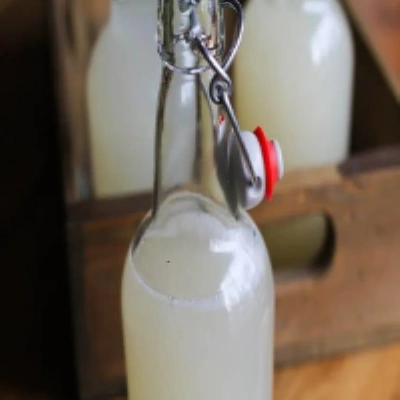
Pour the liquid (including the ginger pulp) into sealable bottles and set them in a dark room for 2 to 4 days. This process makes the ginger beer very fizzy.
The warmer the room, the faster the beverage gets fizzy, so open a bottle every day or so to check the fizz and level of sweetness.
Both the fizz and sweetness is up to your taste but be very careful to not allow the bottles to sit for too long because they most definitely will explode.
Place bottles in the refrigerator to calm the fermentation process. Note that the ginger beer will continue to ferment in the refrigerator, so try to consume the beverage within a few days after secondary fermentation is complete for best results.
Leaving it in the refrigerator for longer than a week will result in a “drier”, less sweet ginger beer.
You can now brew another batch of ginger beer using the ginger starter you have been feeding. Because your ginger starter is now more mature, it will take a little less time to brew your second batch.

SECONDARY FERMENTATION
Once ginger beer is finished with its primary fermentation, you may add additional sugar and/or ingredients (see “Flavoring Ginger Beer” section below) to flavor it and allow it to go through a secondary fermentation.
The purpose of secondary fermentation is threefold: To achieve a fizzy beverage (it will get just as fizzy, if not fizzier than soda!), to make the drink even more probiotic-rich, and to give it delicious flavor.
FLAVORING GINGER BEER
Ginger beer is perhaps the easiest probiotic drinks to flavor because just about any type of fruit and/or herb goes wonderfully with ginger.
The fact that there is already a great deal of sweet and spicy flavor in ginger beer provides a wonderful canvas for incorporating other sweet, sour, tart or creamy flavors.
In this way, the added ingredients are typically what one tastes first when drinking the ginger beer, with the spicy ginger coming through at the finish.
You have a few options for adding ingredients for secondary fermentation. You can add fresh fruit juice, a homemade simple syrup infused with any flavor you like, or a fruit/herb sauce (similar concept to simple syrup).
If you’re adding fruit juice, simply add 1/4 cup to each glass bottle before filling them the rest of the way up with ginger beer. Secure the lids tightly and allow them to sit for 2 days. Immediately transfer to the refrigerator to slow the fermentation process.
Getting creative with fruit and herb combinations is brilliant when it comes to this drink and you are virtually guaranteed to end up with a delicious probiotic drink!
Fill the bottles the rest of the way up with ginger beer, seal tightly, and allow bottles to sit at room temperature for 2 days to undergo secondary fermentation. Transfer the bottles of ginger beer to the refrigerator and chill.

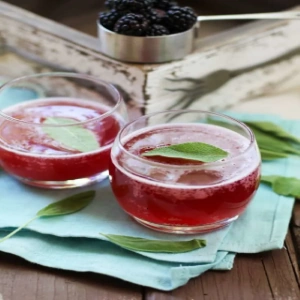
Here are some of my favorite flavor combinations for ginger beer:
- Blackberry Sage (2 cups blackberries, 1/2 cup sugar, 1/3 cup fresh sage, packed)
- Grapefruit Rosemary (1 cup fresh grapefruit juice, 2/3 cup sugar, 3 sprigs rosemary)
- Coconut Basil (1 can full-fat coconut milk, 1/2 cup sugar, 1/2 cup fresh basil, packed)
- Blood Orange (1 cup fresh blood orange juice, 1/2 cup sugar)
- Raspberry Mint (2 cups fresh raspberries, 1/2 cup sugar, 1/2 cup fresh mint)
SHELF LIFE OF GINGER BEER
When properly sealed in bottles, plain ginger beer can last for up to one month in the refrigerator. For best results, drink within 2 weeks of brewing.
When ingredients such as fruit, are added to ginger beer, consume within 1 week for best results and keep in the refrigerator for up to 2 weeks. While ginger beer can last even longer than this, it is best to err on the safe side when it comes to probiotics.
A NOTE OF CAUTION
As is always the case with probiotic beverage, be cautious when opening a bottle after secondary fermentation as pressure builds and the drink will be fizzy. Never point a bottle at your face (or at any other person) while opening, and never hand a bottle to a child to open.
TROUBLESHOOTING
If it seems like either your ginger starter or ginger beer is taking a long time to come to life (get bubbly), don’t worry. This is likely the result of the temperature of your home, and it may just take some extra time.
As mentioned previously, if you want to expedite the process, wrap the jar in a heating pad and set it to a low temperature to keep the starter warm.
On the flipside, in rare cases, a ginger starter may be ready after only a few days. As long as bubbles are flowing from the bottom to the top, that is a sign the starter is rich in probiotics and is ready to be put to use.
At the end of secondary fermentation, if your ginger beer too dry (not sweet and very fizzy), this is because the yeast consumed all of the sugar that was in the bottle, leaving very little sweetness for you.
Some people prefer drier ginger beer, but if you prefer it to be on the sweet side, simply make sure you add additional sugar (either cane sugar, fruit, or juice) prior to bottling your next batch.
Did you pop open a bottle of ginger beer after 3 days of secondary fermentation and it wasn’t fizzy and it still tasted sweet? If this is the case, your ginger beer still contains residual sugar that needs to get eaten up by the probiotics. This is okay!
Simply leave the remaining bottles (if any) at room temperature to continue secondary fermentation. Because there was plenty of sugar in the beverage prior to bottling, it will simply take an additional day or two for the probiotics to consume the sugar and for the beverage to become fizzy.
How to Prevent Flat Ginger Beer:
To prevent flat ginger beer, be sure there are small bubbles that rise from the bottom to the top of the liquid prior to bottling it for secondary fermentation, as this is a sign of probiotic activity. Keep in mind that even if your ginger beer does not get fizzy, it is still full of probiotics and is great for you!
Wondering if Your Batch is Bad?
If at any point you find mold on the surface of your ginger beer while it is brewing, throw the whole batch out, even if it is only a tiny bit of mold. Ginger beer is easy to re-make (especially since you already have your ginger starter ready to go), and it is not worth sacrificing quality and health even if it is frustrating to have a failed batch.
Save Stacks of Cash Every Month on Food…
The Very Best Wild Plants to Forage

Books can be your best pre-collapse investment.
Carnivore’s Bible (is a wellknown meat processor providing custom meat processing services locally andacross the state of Montana and more. Whether your needs are for domestic meator wild game meat processing)
The Lost Book of Remedies PDF ( contains a series of medicinal andherbal recipes to make home made remedies from medicinal plants and herbs.Chromic diseases and maladies can be overcome by taking the remediesoutlined in this book. The writer claims that his grandfather was taughtherbalism and healing whilst in active service during world war twoand that he has treated many soldiers with his home made cures. )
Easy Cellar(Info about building and managing your root cellar, plus printable plans. The book on building and using root cellars – The Complete Root Cellar Book.)
The Lost Ways (Learn the long forgotten secrets that helped our forefathers survive famines,wars,economic crisis and anything else life threw at them)
LOST WAYS 2 ( Wordof the day: Prepare! And do it the old fashion way, like our fore-fathers did it and succeed longbefore us,because what lies ahead of us will require all the help we can get. Watch this video and learn the 3 skills that ensured our ancestors survival in hard times offamine and war.)