
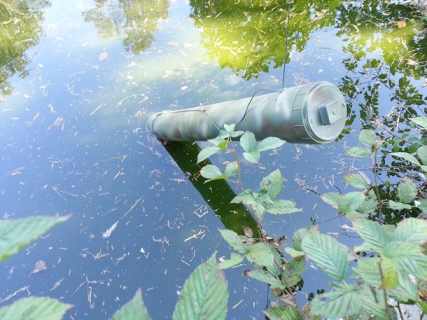
 You can make your own underwater pipe cache.
Photograph by Rick Austin and Survivor Jane, Aleven Goats Media, Inc.
Inspired by prepper Rodney Dial’s extravagant underwater cache system, but don’t have the means to travel by boat or have scuba gear laying around? We’re bringing you budget versions of the preps inspired by our very own season three prepper builds.
Problem: It can be difficult to find secret buried caches of food, supplies, and ammunition once they are in the ground. And it can take too much time to dig them up, just when you need them the most.
Solution: Underwater Caches. By using waterproof PVC plastic piping to hide your supplies, your cache can be hidden in plain sight (under water in a pond, stream, water tank, etc.). And your cache can quickly be recovered when you need it most.

One of the biggest hurdles preppers could face after disaster strikes is safeguarding their food, supplies, and ammunition from refugees and marauders. That is, unless they have a plan in place beforehand. Some preppers have buried their preps in underground caches, but even this has its problems. Landscapes change, a map is lost or misplaced, no digging tools are available when the time comes to retrieve the cache(s), or you are on the run with little time to dig something up.
As an alternative, you might want to consider underwater caches. While caching preps deep underwater, accessible only by scuba-gear, may seem like the ultimate solution (at least for prepper Rodney Dial), most of us do not have diving experience and gear. The good news is water caches do not have to be deep under water to be effective. Look around. Most of us have water around us. There are streams, ponds, rain barrels, and culverts – and anything that can hold water can also hold a hidden cache. The key is to place these underwater caches in areas with relatively shallow water, and in the case of a pond, near the shoreline, anchored to the ground. You should be able to walk and retrieve it, and not have to dive down into the water to get it.
Consider What to Store:

In determining the appropriate size for your underwater cache, first think about what you will be putting into the cache. As with all preps, focus on basic needs and include items such as food with a long shelf life, defensive weapons, emergency medical supplies, shelter items, bush-craft tools, and other immediate survival supplies. Some additional items to consider would be 550 foot paracord, map, knife, fire starter, hat, poncho, bandana, first-aid kit, a multi-tool, underwear, socks, water treatment tablets and/or water filter, tarp, flash-light, cooking utensils/small pot, as well as weapons and ammunition for hunting and protection.
Get Building:
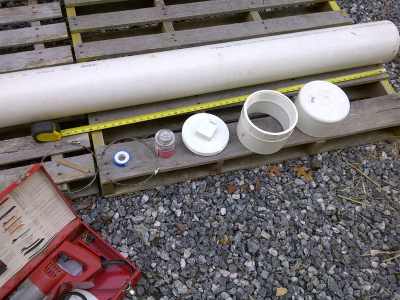 Although PVC pipe comes in various sizes, to maximize your storage and allow for wider items, for this demonstration we will be using a 6” diameter pipe.
Saw, tape measure, teflon tape, metal pipe clamps, PVC cement, pipe and fittings.
Materials You Will Need:
Tools: Electric or hand saw, tape measurer, pencil, screw driver, pliers
6” diameter Schedule 40- PVC pipe which has a crushing pressure of 400 pounds. $41.48 for 10’ (TIP: These usually come in 10” lengths. One pipe would be enough to make two or three caches).
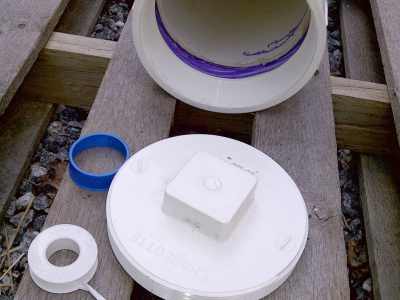
6” PVC Cap (to enclose one end of pipe) -$11.51
6” Clean-Out Adapter -$9.25 (to enclose the other end- but allow for screw out opening of pipe)
Clean out plug -$5.21
PVC primer -$7.48 – 8 oz can
PVC all-purpose cement -$6.38 – 8 oz can
2 stainless steel pipe clamps -$2.06 ea.
550 camouflaged paracord
Nylon Rope or paracord (camouflaged colors preferred)
Silicone sealant or Teflon Tape – $1.47
Silica gel pack
Silica Gel/Desiccant – Quick Tip: Make your own with a pair of pantyhose – $1.47 and crystal cat litter/silica sand crystals – $4.32 for a 4 lb. bag
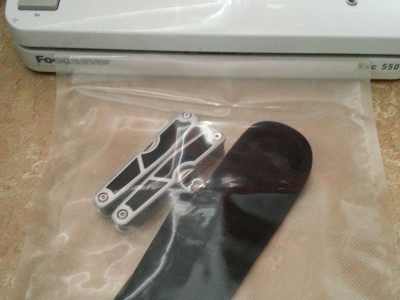
Vacuum Seal Bags – Quick Tip: Each object or group of objects should be sealed individually
Kitchen electric vacuum sealer
Monofilament fishing line 250’ of 30 lb. test -$2.86
Bobbers -$1.26 for 6
Camouflage paint -$3.67/can
The Steps:
1. Begin by measuring and then marking the PVC pipe to the desired length. Using an electric reciprocating saw (or a hand saw), cut at the measured mark on the PVC.

2. Cut along your measurement with a saw.
 3. Once the PVC pipe is cut to the proper length, use PVC primer and PVC cement to glue the end cap (non-opening end) on to one end of the pipe. (Hint: put PVC cement on both the inside of the fitting, and the outside of the pipe end; and then quickly slide both together.)
4. Place primer on the two surfaces to be glued.
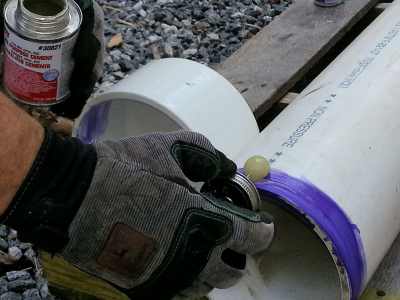
5. Place PVC cement on the two surfaces and quickly slide both together
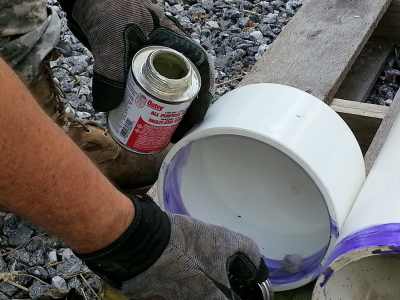
6. Glue the fitting to the pipe as per previous instructions.
7. Wrap Teflon tape around the threads of the clean-out plug for a water tight seal.
8. Now wrap teflon tape on to the threads of the clean-out plug and screw the plug into the fitting.
9. After tying the paracord to the end, clamp it down with stainless steel clamps on both ends.
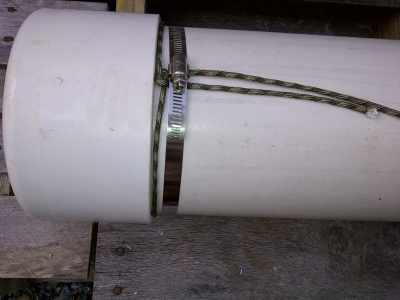
10. Add a stainless steel clamp to both the cap end and clean-out end.
11. Tie paracord around pipe ends and then clamp down the paracord on both pipe ends, making sure to leave a little slack between the two, so that the paracord may be used as a shoulder sling to carry the pipe; if need be (You may need to move quickly once you have recovered the cache.)
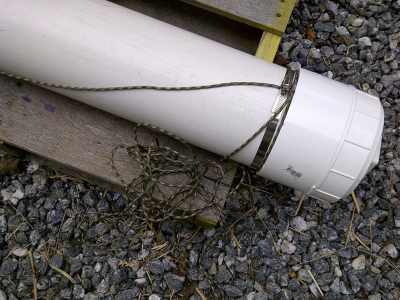
12. On the clean-out end of the pipe, leave a length of paracord long enough to reach from where the pipe will be sitting on the bottom under water, to the shoreline.
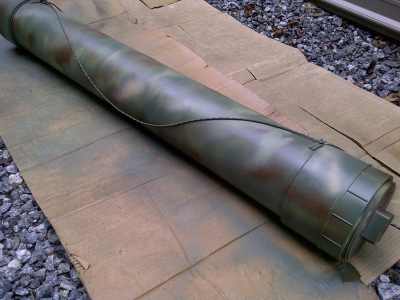
13. Paint all surfaces of the PVC pipe using ultra-flat non-reflective camouflage paint. This will camouflage the pipe under water as well as after you recover it.
14. After paint dries, gather the items to be placed in the pipe and make sure they fit through the cleanout fitting (with screw cap off).
15. Individually vacuum seal each item with a standard kitchen vacuum sealer and make sure they are air tight. (Take care as any sharp items may puncture the vacuum sealed bag, so when necessary cover sharp objects with cardboard to avoid puncture.)
16. Place the items in the PVC pipe and add desiccant (i.e. silica gel packs) into the pipe for moisture absorption – to eliminate rust and mold in the event any vacuum sealed bags leak.
Quick Tip: you can make your own desiccant by cutting pantyhose in to 2” squares, adding a tablespoon of crystals to each square and then tying them with nylon string.
17. Seal off the end of the clean-out by screwing in the clean- out plug with Teflon tape on the threads.
NOTE: You will need at least a 24″ wrench to grab the plug end for a 6″ pipe. Make sure you hide the wrench somewhere close to your cache so you can open it in an emergency. – DO NOT SEAL THE WRENCH IN THE CACHE.
18. Tie a length of monofilament fishing line to the end of the paracord so that you can have a fishing line tied to a bobber or, just simply to an onshore tree trunk, this way you can pull in the paracord, and then use the stronger paracord, to pull in the heavy cache.

19. Lower the cache into the water via your paracord.
20. Tie the top end of the monofilament line to a nearby tree, or immovable object (the entire line will eventually blend into the soil.)
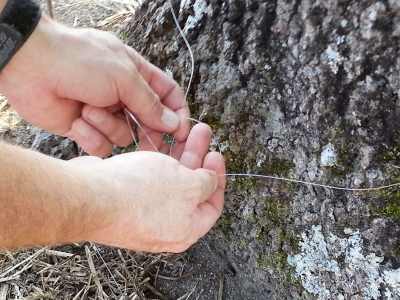
TIP: The region you live in will undoubtedly determine the best location for your cache(s). Keep these things in mind when making your determination: rivers and streams are subject to flooding in the rainy seasons; ponds and lakes will freeze in winter; and, ponds, lakes, streams, and rivers can dry up during extreme drought conditions. Be creative. If you are in a farm setting you may consider caching in one of your animal water troughs no longer in use. If you have an old rain water barrel, drop a cache in it. And you can also use a nearby ditch or culvert. If you are considering using a lake nearby or in your community, keep in mind that people may fish in these areas and may snag your monofilament line so placement will be critical.
Other useful resources:
Blackout USA (EMP survival and preparedness)
Conquering the coming collapse (Financial advice and preparedness )
Liberty Generator (Build and make your own energy source)
Backyard Liberty (Easy and cheap DIY Aquaponic system to grow your organic and living food bank)
Bullet Proof Home (A Prepper’s Guide in Safeguarding a Home )
About the Authors:
Survivor Jane is a preparedness expert, homesteader, and speaker. She is the editor ofwww.SurvivorJane.com one of the world’s highest rated preparedness information sites. Survivor Jane is also the founder of #PrepperTalk on Twitter, a 24 hour forum that brings over 300,000 people together from all over the world to discuss preparedness ideas. Jane also moderates Tweet Chats for National Geographic Channel’s hit TV series Doomsday Preppers and Doomsday Castle.
Rick Austin is known as the Survivalist Gardener, and is a preparedness and off-grid living expert. He is the author of Secret Garden of Survival-How to Grow a Camouflaged Food Forest, which is now the #1 Best Selling book in Garden Design. Rick has also been featured on National Geographic Channel’s Doomsday Castle, as well as the documentary film, Beyond Off Grid, and in Mother Earth News. For more info and all his social media links, go to his website. www.SecretGardenOfSurvival.com. You can also hear Rick on his radio show Secrets of a Survivalist where each week he talks with the world’s best survival experts that share their own secrets of survival.
One additional step required …. after you cut the 6 inch PVC pipe you’ll need to deburr the edges …. especially the outside edges ….. a mill file, sandpaper and a sharp knife will do the job nicely ….