
During the early 1800s, cooking dominated the time and energy of the average housewife. There were no big grocery stores where families could go to purchase food, and eating out was truly a rare treat, usually possible only when traveling. Most fruits and vegetables were grown on the farmstead, and families processed meats such as poultry, beef, and pork. People had seasonal diets. In the spring and summer months, they ate many more fruits and vegetables than they did in the fall and winter. During those colder seasons, families found ways to preserve their food.
The three main ways of curing (the process of preserving food) during this time included drying, smoking, and salting. Each method drew moisture out of foods to prevent spoiling. Fruits and vegetables could be dried by being placed out in the sun or near a heat source. Meat products could be preserved through salting or smoking. A salt cure involved rubbing salt into the meat, which was then completely covered in salt and placed in a cool area for at least twenty-eight days. During this time, more salt was constantly added. When the meat was no longer damp, it was washed, then shelved or bagged and left to age. Families would hang meat preserved through a smoke cure in rooms or buildings with fire pits. For a month, the meat was constantly exposed to smoke, which dried it out while adding flavor. Using different kinds of wood for the fire, such as hickory or oak, could produce different tastes.
A typical day on the farm began very early. Women rose and built the fire based on the meals planned for that day. Families who could afford to have detached kitchens—kitchens in buildings separate from the house—did so for several reasons. The kitchen often was hot, smoky, and smelly. Most North Carolina families did not have the resources for a separate kitchen, though, and the hearth provided the center of home life and family activity. With no ovens or electricity, women prepared meals on the hearths of brick fireplaces. They used different types of fires and flames to prepare different types of food. For example, a controllable fire was used to roast and toast, while boiling and stewing required a smaller flame.
To use all of the fire’s energy, families shoveled coals and ash underneath and onto the lids of Dutch ovens. Standing on three legs and available in a wide array of sizes, the cast-iron Dutch oven was one of the most important tools found on the hearth. It was used to prepare several types of food and allowed cooking from both the top and the bottom. Dutch ovens evolved into woodstoves, common in homes of the later 1800s and early 1900s before most people got electricity at home.
Preparing meals was not just a matter of starting a fire for cooking. Spices, such as nutmeg and cinnamon, and seasonings, like salt and pepper, had to be ground up with mortars and pestles. Milk had to be brought in from the family dairy cow and cream and butter made from it. After someone brought in the milk, it usually sat out for about an hour. The cream rose to the top, separating from the milk. Women placed this cream into a butter churn and beat it until it hardened, first into whipped cream and eventually into butter!
Every family member contributed to the production and preparation of meals. Men and boys spent most of their time outdoors. Chores included working crops in the fields, feeding larger livestock, and hunting. Diets included wild game, such as deer and turkeys. Women and girls worked mainly in the kitchen and fed smaller livestock.
When it came time to butcher animals, families joined with their neighbors to share the workload and the meat. Pork was the staple meat in the Southeast until the 1940s. Hogs proved more manageable than their much larger counterparts, cows. The taste of pork also improved with curing. Neighbors often gathered in the fall, using the time to get their work done but also to catch up, sharing news and gossip. What began as a chore turned into a social event. This was also the case at harvesttime. Neighbors pitched in to bring in crops such as corn and wheat. After the work was done, everyone might celebrate with feasts, bonfires, and dancing.
Clearly, meal preparation two hundred years ago involved several more steps than it does now. Much like today, families usually ate three daily meals. The main meal in the 1800s, however, was not the large evening meal that is familiar to us today. Rather, it was a meal called dinner, enjoyed in the early afternoon. Supper was a smaller meal eaten in the evening.
A big difference between the way people eat today compared with long ago is the work and time needed. For modern families, food and meals are merely an afterthought in the schedule. Two hundred years ago, food and food preparation stood at the center of the family’s daily lifestyle. Without the advances in technology that help us store, preserve, and prepare food, men and women would spend much of their time getting meals ready to eat. Instead of calling pizza delivery, imagine spending all day in front of a fire!

Curing
Meat curing is the application of salt, color fixing ingredients, and seasoning in order to impart unique properties to the end product.
Historical Background
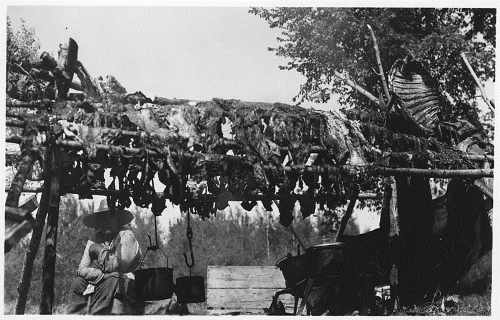
The salting and smoking of meat was an ancient practice even before the birth of Christ. These early processed meat products were prepared for one purpose, their preservation for use at some future time. Salt was used at concentrations high enough to preserve the meat. Preservation by smoking is believed to have been developed inadequately by the primitive tribes. The American Indians preserved meat prior to settlement by Europeans by hanging it in the top of a teepee to maximize contact with campfire smoke. The origin of the use of nitrite is lost in history. Salt containing nitrates was used in Homer’s time (850 B.C.) to preserve meat. Nitrate was present originally as a natural impurity in the salts used in curing but, unknown to the users, was a key ingredient in the curing process. The Romans, who learned the art of curing meat with salt from the Greeks, were the first to note the reddening effect now attributed to nitrite. Although the role of nitrites in cured meat was not really understood until early in the 20th century, it is clear that for thousands of years nitrite has played an important role in meat curing.
Curing Ingredients
The two main ingredients that must be used to cure meat are salt and nitrite. However, other substances can be added to accelerate curing, stabilize color, modify flavor, and reduce shrinkage during processing. Salt is the primary ingredient used in meat curing. Originally it served as a preservative by dehydration and osmotic pressure which inhibits bacterial growth. Salt still functions as a preservative in the “country style” cured meat product.
The main function of salt in other cured products is to add flavor. However; even at low concentrations salt has some preservative action. Salt levels are dependent on consumer’s taste, but a two to three percent concentration in the product is about right. Nitrates and nitrites, either potassium or a sodium salt, are used to develop cured meat color. They impart a bright reddish, pink color, which is desirable in a cured product. In addition to the color role, nitrates and nitrites have a pronounced effect on flavor. Without them a cured ham would be simply a salty pork roast.
They further affect flavor by acting as powerful antioxidants. Antioxidants are compounds that prevent the development of oxidative rancidity, which would reduce the keeping quality. Sodium nitrites also prevent the growth of a food poisoning microorganism known as Clostridium botulimum, the bacteria that causes botulism. Nitrates and nitrites must be used with caution during curing.
They are toxic when used in large amounts. The Federal and State Meat Inspection regulations limit the amount that can be used in curing. It is important that exact amounts are used and the curing mixture is thoroughly mixed. The use level of sodium nitrate or potassium nitrate (saltpeter) is 3 1/2 oz. per 100 pounds meat for dry cure or 7 pounds nitrate per 100 gallons pickle (liquid cure) at 10percent pump level. The use of sodium or potassium nitrite is limited to 1 oz. per 100 pounds meat for dry cure, or 2 pounds per 100 gallons pickle (liquid cure) at 10percent pump level. Nitrites combined with nitrates should not be greater than 156 ppm ingoing into hams or 120 ppm ingoing into bellies. Sugar (sucrose) serves several important purposes in cured meat.
First of all, it adds flavor, and secondly, it counteracts the harshness of salt. Also sugar provides a surface color characteristic of aged ham if caramelized sugar is used. Both brown and white sugars can be used. The sugars most frequently used are sucrose, cane sugar, dextrose, and invert sugar. The amount of sugar used is selflimiting due to its sweetening power. Ascorbates (sodium ascorbate or sodium erythorbate) are used to speed the curing reaction by faster color development through more rapid reduction of nitrates and nitrites to nitric oxide. The nitric oxide combines with the meat pigment, myoglobin, to form nitrosomyglobin, dark red color. When the product is heated to 130-140°F the nitrosomyoglobin is converted to a stable pigment, nitrosohemochrome light pink in color. Also ascorbates are used to stabilize cure color of meats. The most frequently used cure accelerator compounds are sodium ascorbate or sodium erythorbate. Curing pickle containing these compounds should be used within 24 hours because their reaction with nitrite will lower the nitrite level of the pickle and its effectiveness. The ingredient phosphate should be used only for those meats cured with a liquid cure. Phosphates are adjuncts used to increase the water holding capacity of cured products.
In creased water holding capacity will increase yields of product and improve retention of brine. Phosphates are not easily soluble in a pickle. It is recommended to dissolve the phosphates first then add it to the pickle. Sodium tripolyphosphate, sodium hexametaphosphate, and sodium pyrophosphate are approved by USDA for use in meat curing. Water must not be taken for granted as an ingredient of curing pickle (liquid cure). It acts as a carrier of the other ingredients, influences composition of the meat, and it may contribute to palatability or juiciness of the product. Yield of finish product is dependent on amount of water retained during the curing and cooking process. Such yields are critical in determining the price of the finished cooked product.
Curing Methods
Dry curing
Best used to cure hams, bacon and smaller cuts of meat, dry curing involves applying the cure mix directly on the meat. After the application, place meat into a plastic food storage bag and tightly seal. From there, put your meat in the refrigerator and let the curing process take place. After curing, remove excess salt by rinsing your meat. The final step is to cook your meat and taste.
Brine Curing
Also called the sweet pickle cure, brine curing is also a favorite for curing meat. This method involves combining curing salt and water to create a sweet pickle solution. To prepare the brine, use a large non-corrosive bowl, such as plastic or glass. To cure, inject the brine solution into the meat using a meat pump or soak the meat over a period of time. If you choose to soak, be sure to fully submerge the meat. A plate can be used as a weight to keep the meat immersed in your brine. Like dry curing, the process takes place in the refrigerator and the cured meat needs to be cooked when finished.
Combination Curing
When you couple the dry rub cure and brine solution injections, the result is combination curing. Used to cure hams, this method shortens the curing time and reduces the risk of spoilage because the process takes place both inside and outside the ham. Again, curing is done in the refrigerator and the ham is cooked thereafter.
Sausage Curing
The sausage curing method, unlike those previously described, is accomplished by mixing curing salts and spices with ground meat. The curing process is then done in the refrigerator. When the curing process is complete, the sausage is cooked before serving.
Smoking of Meat
Smoking
Smoke for treatment of meat products is produced from raw wood. Smoke is generated through the thermal destruction of the wood components lignin and cellulose. The thermal destruction sets free more than 1000 desirable or undesirable firm, liquid or gaseous components of wood.
These useful components contribute to the development of the following desirable effects on processed meat products:
- Meat preservation through aldehydes, phenols and acids
- (anti-microbial effect)
- Antioxidant impact through phenols and aldehydes
- (retarding fat oxidation)
- Smoke flavour through phenols, carbonyls and others
- (smoking taste)
- Smoke colour formation through carbonyls and aldehydes
- (attractive colour)
- Surface hardening of sausages/casings through aldehydes (in particular for more rigid structure of the casing)
What happens if we lose power indefinitely — foods that require freezing or refrigeration for long term storage are going to go bad. Emergency food storage in advance will be the only way to feed yourself and your family.
The most known undesirable effect of smoking is the risk of residues of benzopyrene in smoked products which can be carcinogenic if the intake is in high doses over long periods. With normal eating habits, a carcinogenic risk is normally not associated with moderately smoked food such as smoked meat products.
Depending on the product, smoke is applied at different temperatures. There are two principal smoking techniques:
- Cold smoking
- Hot smoking
The principle of both methods is that the smoke infiltrates the outside layers of the product in order to develop flavor, color and a certain preservation effect.
Cold Smoking – This is the traditional way of smoking of meat products and was primarily used for meat preservation. Nowadays it serves more for flavor and color formation, for example in sausages made from precooked materials such as liver sausage and blood sausage (see page 153, 161).
The combination of cold smoking and drying/ripening can be applied to fermented sausages (see page 124) and salted or cured entire meat pieces (see page 176), in particular many raw ham products. In long-term ripened and dried hams, apart from providing colour and favour, the cold smoking has an important preservative effect as it prevents the growth of moulds on the meat surfaces.
The optimal temperature in “cold” smoking is 15 to 18°C (up to 26°C). Sawdust should be burned slowly with light smoke only and the meat hung not too close to the source of the smoke. Cold smoking is a long process which may take several days. It is not applied continuously, but in intervals of a few hours per day.
Hot Smoking – Hot smoking is carried out at temperatures of +60 to 80°C. The thermal destruction of the wood used for the smoking is normally not sufficient to produce these temperatures in the smoking chamber. Hence, additional heat has to be applied in the smoking chamber.

| Fig. 69: Hotdogs are placed in the smokehouse for hot smoking (pale colour before smoking) |

Hot smoking periods vary from not much longer than 10 minutes for sausages with a thin calibre such as frankfurters to up to one hour for sausages with a thick calibre such as bologna and ham sausage and products like bacon and cooked hams.The relatively high temperatures in hot smoking assure a rapid color and flavor development. The treatment period is kept relatively short in order to avoid excessive impact of the smoke (too strong smoke color and flavor).

Products and smoking – Cold smoking is used for fermented meat products (raw-cured ham, raw-fermented sausage) and precooked-cooked sausage (liver and blood sausages). Hot smoking is used for a range of raw-cooked sausages, bacon and cooked ham products. Smoke treatment can only be applied, if meat the products are filled in casings permeable to smoke (see page 248, 261). All natural casings are smoke permeable, as are cellulose or collagen basis synthetic casings.
Smoke permeable casings can also be treated using a new technology, where a liquid smoke solution is applied on the surface. This can be done by dipping in solution, showering (outside chamber) or atomization (spraying inside chamber). Polyamide or polyester based synthetic casings are not permeable to smoke. If smoke flavour is wanted for products in such casings, small quantities of suitable smoke flavour (dry or liquid) are added directly to the product mix during manufacture.
Effects:

|

Books can be your best pre-collapse investment.
Carnivore’s Bible (is a wellknown meat processor providing custom meat processing services locally andacross the state of Montana and more. Whether your needs are for domestic meator wild game meat processing)
The Lost Book of Remedies PDF ( contains a series of medicinal andherbal recipes to make home made remedies from medicinal plants and herbs.Chromic diseases and maladies can be overcome by taking the remediesoutlined in this book. The writer claims that his grandfather was taughtherbalism and healing whilst in active service during world war twoand that he has treated many soldiers with his home made cures. )
Easy Cellar(Info about building and managing your root cellar, plus printable plans. The book on building and using root cellars – The Complete Root Cellar Book.)
The Lost Ways (Learn the long forgotten secrets that helped our forefathers survive famines,wars,economic crisis and anything else life threw at them)
LOST WAYS 2 ( Wordof the day: Prepare! And do it the old fashion way, like our fore-fathers did it and succeed longbefore us,because what lies ahead of us will require all the help we can get. Watch this video and learn the 3 skills that ensured our ancestors survival in hard times offamine and war.)
Survival MD (Best Post Collapse First Aid Survival Guide Ever)
Conquering the coming collapse (Financial advice and preparedness )
Liberty Generator (Build and make your own energy source)
Backyard Liberty (Easy and cheap DIY Aquaponic system to grow your organic and living food bank)
Bullet Proof Home (A Prepper’s Guide in Safeguarding a Home )
Family Self Defense (Best Self Defense Strategies For You And Your Family)
Survive Any Crisis (Best Items To Hoard For A Long Term Crisis)
Survive The End Days(Biggest Cover Up Of Our President)